Managing chassis
Lenovo XClarity Administrator can manage several types of systems, including the Flex System chassis.
Before you begin
Review the management considerations before managing a device. For information, see Management considerations.
Certain ports must be available to communicate with the CMM for the chassis being managed. Ensure that these ports are available before you attempt to manage a chassis. For more information about ports, see Port availability.
Ensure that the minimum required firmware is installed on each chassis that you want to manage using XClarity Administrator. You can find minimum required firmware levels from the XClarity Administrator Support – Compatibility webpage by clicking the Compatibility tab and then clicking the link for the appropriate device types.
Ensure that the Number of simultaneous active sessions for LDAP users setting in the CMM is set to 0 (zero) for the chassis. You can verify this setting from the CMM web interface by clicking , click Global Login Settings, and then click the General tab.
Ensure that there are at least three TCP command-mode sessions set for out-of-band communication with the CMM. For information about setting the number of sessions, see tcpcmdmode command in the CMM online documentation.
To discover a chassis that is on a different subnet from XClarity Administrator, ensure that one of the following conditions are met:
Ensure that you enable multicast SLP forwarding on the top-of-rack switches, as well as the routers in your environment. See the documentation that was provided with your specific switch or router to determine whether multicast SLP forwarding is enabled and to find procedures to enable it if it is disabled.
If SLP is disabled on the endpoint or on the network, you can use DNS discovery method instead by manually adding a service record (SRV record) to your domain name server (DNS), for XClarity Administrator for example.
_lxca._tcp.labs.lenovo.com service = 0 0 443 fvt-xhmc3.labs.lenovo.com.Then, enable DNS discovery on the CMM from the management web interface, by clicking , clicking the DNS tab, and selecting Use DNS to discover Lenovo XClarity Administrator.
NoteThe CMM must be running a firmware level dated May 2017 to support automatic discovery using DNS.
If there are multiple XClarity Administrator instances in your environment, the chassis is discovered only by the instance that is the first to respond to the discovery request. The chassis is not discovered by all instances.
Consider implementing either IPv4 or IPv6 addresses for all CMMs and Flex switches that are managed by XClarity Administrator. If you implement IPv4 for some CMMs and Flex switches and IPv6 for others, some events might not be received in the audit log (or as audit traps).
About this task
XClarity Administrator can automatically discover chassis in your environment by probing for manageable systems that are on the same IP subnet as XClarity Administrator. To discover chassis that are in other subnets, specify an IP address or range of IP addresses, or import information from a spreadsheet.
After the chassis are managed by XClarity Administrator, XClarity Administrator polls each managed chassis periodically to collect information, such as inventory, vital product data, and status. You can view and monitor each managed chassis and perform management action (such as configuring system information, network setting, and failover). For chassis that are in protected mode, management actions are disabled.
Chassis are managed using XClarity Administrator managed authentication.
When local authentication is used for rack servers, Lenovo chassis, and Lenovo rack switches, XClarity Administrator uses a stored credential to authenticate to the device. The stored credential can be an active user account on the device or a user account in an Active Directory server.
You must create a stored credential in XClarity Administrator that matches an active user account on the device or a user account in an Active Directory server before managing the device using local authentication (see Managing stored credentials).
NoteRackSwitch devices support only stored credentials for authentication. XClarity Administrator user credentials are not supported.Using managed authentication allows you to manage and monitor multiple devices using credentials in the XClarity Administrator authentication server instead of local credentials. When managed authentication is used for a device (other than ThinkServer servers, System x M4 servers, and switches), XClarity Administrator configures the device and its installed components to use the XClarity Administrator authentication server for centralized management.
- When managed authentication is enabled, you can manage devices using either manually-entered or stored credentials (see Managing user accounts and Managing stored credentials).
The stored credential is used only until XClarity Administrator configures the LDAP settings on the device. After that, any change to the stored credential has no impact the management or monitoring of that device.
NoteWhen managed authentication is enabled for a device, you cannot edit stored credentials for that device usingXClarity Administrator. - If a local or external LDAP server is used as the XClarity Administrator authentication server, user accounts that are defined in the authentication server are used to log in to XClarity Administrator, CMMs and baseboard management controllers in the XClarity Administrator domain. Local CMM and management controller user accounts are disabled.NoteFor Think Edge SE450, SE350 V2, and SE360 V2 servers, the default local user account remains enabled and all other local accounts are disabled.
- If an SAML 2.0 identity provider is used as the XClarity Administrator authentication server, SAML accounts are not accessible to managed devices. However, when using an SAML identity provider and an LDAP server together, if the identity provider uses accounts that exist in the LDAP server, LDAP user accounts can be used to log into the managed devices while the more advanced authentication methods that are provided by SAML 2.0 (such as multifactor authentication and single sign-on) can be used to log into XClarity Administrator.
- Single sign-on allows a user that is already logged in to XClarity Administrator to automatically log in to the baseboard management control. Single sign-on is enabled by default when a ThinkSystem or ThinkAgile server is brought into management by XClarity Administrator (unless the server is managed with CyberArk passwords). You can configure the global setting to enable or disable single sign-on for all managed ThinkSystem and ThinkAgile servers. Enabling single sign-on for a specific ThinkSystem and ThinkAgile server overrides the global setting for all ThinkSystem and ThinkAgile servers (see Managing servers).NoteSingle sign-on is disabled automatically when using the CyberArk identity-management system for authentication.
- When managed authentication is enabled for ThinkSystem SR635 and SR655 servers:
- Baseboard management-controller firmware supports up to five LDAP user roles. XClarity Administrator adds these LDAP user roles to the servers during management: lxc-supervisor, lxc-sysmgr, lxc-admin, lxc-fw-admin, and lxc-os-admin.
Users must be assigned to at least one of the specified LDAP user roles to communicate with ThinkSystem SR635 and SR655 servers.
- Management-controller firmware does not support LDAP users with the same username as local user of the sever.
- Baseboard management-controller firmware supports up to five LDAP user roles. XClarity Administrator adds these LDAP user roles to the servers during management: lxc-supervisor, lxc-sysmgr, lxc-admin, lxc-fw-admin, and lxc-os-admin.
For ThinkServer and System x M4 servers, the XClarity Administrator authentication server is not used. Instead, an IPMI account is created on the device with the prefix
LXCA_
followed by a random string. (The existing local IPMI user accounts are not disabled.) When you unmanage a ThinkServer server, theLXCA_
user account is disabled, and the prefixLXCA_
is replaced with the prefixDISABLED_
. To determine whether a ThinkServer server is managed by another instance, XClarity Administrator checks for IPMI accounts with the prefixLXCA_
. If you choose to force management of a managed ThinkServer server, all the IPMI accounts on the device with theLXCA_
prefix are disabled and renamed. Consider manually clearing IPMI accounts that are no longer used.If you use manually-entered credentials, XClarity Administrator automatically creates a stored credential and uses that stored credential to manage the device.
NoteWhen managed authentication is enabled for a device, you cannot edit stored credentials for that device usingXClarity Administrator. - Each time you manage a device using manually-entered credentials, a new stored credential is created for that device, even if another stored credential was created for that device during a previous management process.
- When you unmanage a device, XClarity Administrator does not delete stored credentials there were automatically created for that device during the management process.
- When managed authentication is enabled, you can manage devices using either manually-entered or stored credentials (see Managing user accounts and Managing stored credentials).
A device can be managed by only one XClarity Administrator instance at a time. Management by multiple XClarity Administrator instances is not supported. If a device is managed by one XClarity Administrator, and you want to manage it with another XClarity Administrator, you must first unmanage the device on the initial XClarity Administrator, and then manage it with the new XClarity Administrator. If an error occurs during the unmanagement process, you can select the Force management option during management on the new XClarity Administrator.
- Logs in to the chassis using the provided credentials.
- Collects inventory for all components in each chassis, such as the CMM, compute nodes, storage devices, and Flex switches.NoteSome inventory data is collected after the management process completes. The chassis is in the Pending status until all inventory data is collected. You cannot perform certain tasks on a managed device (such as deploying a server pattern) until all inventory data is collected for that device and the chassis is no longer in the Pending state.
- Configures the settings for the NTP server so that all managed devices use the NTP server from XClarity Administrator.
- Assigns the last-edited firmware-compliance policy to the chassis.
- For Lenovo Flex devices, optionally configures the devices firewall rules so that incoming requests are accepted from only XClarity Administrator.
- Exchanges security certificates with the CMM, copying the CMM security certificate into the XClarity Administrator trust store and sending the XClarity Administrator CA security certificate to the CMM. The CMM loads the certificate into the CMM trust store and distributes it to the compute-node service processors for inclusion in their trust stores.
Configures managed authentication. The settings for the CMM LDAP client are changed to use XClarity Administrator as the authentication server, and the Global Login Settings in the CMM are changed to External Authentication Server Only. For more information about managed authentication, see Managing the authentication server.
Creates the recovery user account (RECOVERY_ID). For more information about the RECOVERY_ID account, see Managing the authentication server.
Procedure
Complete one of the following procedures to discover and manage your chassis using XClarity Administrator.
Discover and manage a large number of chassis and other devices using a bulk-import file (see Managing devices).
Discover and manage chassis that are on the same IP subnet as XClarity Administrator.
From the XClarity Administrator menu bar, click . The Discover and Manage New Devices page is displayed.
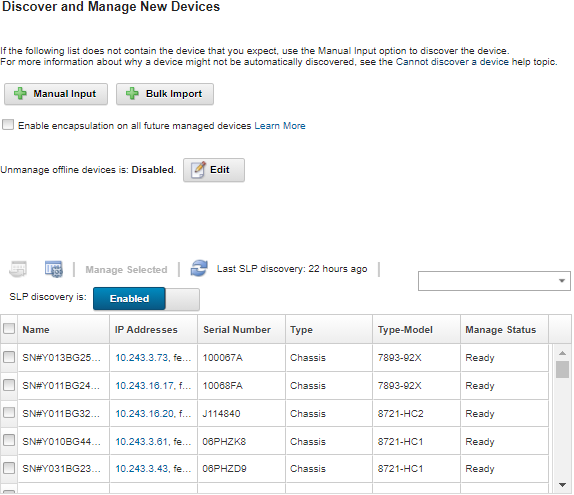
You can sort the table columns to make it easier to find the chassis that you want to manage. In addition, you can enter text (such as a system name or IP address) in the Filter field to further filter the chassis that are displayed. You can change the columns that are displayed and the default sort order by clicking the Customize Columns icon (
 ).
).Click the Refresh icon (
 ) to discover all manageable devices in the XClarity Administrator domain. Discovery might take several minutes.
Click the Enable encapsulation on all future managed devices checkbox to change the firewall rules on all devices during the management process so that incoming requests are accepted from only XClarity Administrator.
Encapsulation can be enabled or disabled on specific devices after they are managed.
AttentionIf encapsulation is enabled andXClarity Administrator becomes unavailable before a device is unmanaged, necessary steps must be taken to disable encapsulation to establish communication with the device. For recovery procedures, see lenovoMgrAlert.mib file and Recovering management with a CMM after a management server failure. Select one or more chassis that you want to manage.
Click Manage Selected.
Choose to use XClarity Administrator managed authentication or local authentication for this device. Managed authentication is selected by default. To use local authentication, clear Managed Authentication.
NoteManaged and local authentication are not supported for ThinkServer and System x M4 servers.Choose the type of credentials to use for the device and specify the appropriate credentials:
Use manually entered credentials
Specify the local user ID and password with lxc-supervisor authority for authenticating to the CMM.
(Optional) Specify a new password for the CMM user account if the password is currently expired on the device.
Use stored credentials
Select the stored credential with lxc-supervisor authority to use for this managed device. You can add stored credentials by clicking Manage Stored Credentials.
NoteIf you choose to use local authentication, you must select a stored credential to manage the device.
TipIt is recommended to use a supervisor or administrator account to manage the device. If an account with lower level authority is used, management might fail, or management might succeed but other futureXClarity Administrator operations on the device might fail (particularly if the device is managed without managed authentication). For more information about normal and stored credentials, see Managing user accounts and Managing stored credentials.
Specify the recovery password if managed authentication is selected.
A recovery account (RECOVERY_ID) is created on the CMM, and all local user accounts are disabled. If there is a problem with XClarity Administrator, and it stops working for some reason, you cannot log in to the CMM using normal user accounts. However, you can log in using the RECOVERY_ID account.
Note:
The recovery password is required if you choose to use managed authentication and is not allowed if you if you choose to use local authentication.
You can choose to use a local recovery account or stored recovery credentials. In either case, the user name is always RECOVERY_ID.
Ensure that the password follows the security and password policies for the device. Security and password policies might vary.
Ensure that you record the recovery password for future use.
For more information about the recovery ID, see Managing the authentication server.
Click Change to change the role groups that are to be assigned to the devices.
NoteYou can select from a list of role groups that are assigned to the current user.
If you do not change the role groups, the default role groups are used. For more information about the default role groups, see Changing the default permissions.
Click Manage.
A dialog is displayed that shows the progress of this management process. To ensure that the process completes successfully, monitor the progress.
When the process is complete, the dialog displays the number of devices in the chassis and the chassis status.
NoteSome inventory data is collected after the management process completes. The chassis is in the Pending status until all inventory data is collected. You cannot perform certain tasks on a managed device (such as deploying a server pattern) until all inventory data is collected for that device and the chassis is no longer in the Pending state.When the process is complete, click OK.
The device is now managed by XClarity Administrator, which automatically polls the managed device on a regular schedule to collect updated information, such as inventory.
If management was not successful due to one of the following error conditions, repeat this procedure using the Force management option.
If the managing XClarity Administrator failed and cannot be recovered.
NoteIf the replacementXClarity Administrator instance uses the same IP address as the failed XClarity Administrator, you can manage the device again using the RECOVERY_ID account and password (if applicable) and the Force management option. If the managing XClarity Administrator was taken down before the devices were unmanaged.
If the devices were not unmanaged successfully.
AttentionDevices can be managed by only oneXClarity Administrator instance at a time. Management by multiple XClarity Administrator instances is not supported. If a device is managed by one XClarity Administrator, and you want to manage it with another XClarity Administrator, you must first unmanage the device from the original XClarity Administrator, and then manage it with the new XClarity Administrator. If this is a new chassis, click Continue to Chassis Configuration to validate and change management network settings for the entire chassis (including compute nodes and Flex switches) and to configure the compute node information, local storage, I/O adapters, boot targets, and firmware settings by creating and deploying server patterns. For more information, see Modifying the management-IP settings for a chassis and Configuring servers using configuration patterns.
Discover and manage chassis that are not on the same IP subnet as XClarity Administrator by manually specifying IP addresses.
From the XClarity Administrator menu bar, click . The Discover and Manage page is displayed.
Click the Enable encapsulation on all future managed devices checkbox to change the firewall rules on all devices during the management process so that incoming requests are accepted from only XClarity Administrator.
Encapsulation can be enabled or disabled on specific devices after they are managed.
AttentionIf encapsulation is enabled andXClarity Administrator becomes unavailable before a device is unmanaged, necessary steps must be taken to disable encapsulation to establish communication with the device. For recovery procedures, see lenovoMgrAlert.mib file and Recovering management with a CMM after a management server failure. Select Manual Input.
Specify the network addresses of the chassis that you want to manage:
- Click Single System, and enter a single IP address domain name, or fully-qualified domain name (FQDN).Network AccessTo specify an FQDN, ensure that a valid domain name is specified on
page (see Configuring network access). - Click Multiple Systems, and enter a range of IP addresses. To add another range, click the Add icon (
 ). To remove a range, click the Remove icon (
 ).
).
- Click Single System, and enter a single IP address domain name, or fully-qualified domain name (FQDN).
Click OK.
Choose to use XClarity Administrator managed authentication or local authentication for this device. Managed authentication is selected by default. To use local authentication, clear Managed Authentication.
NoteManaged and local authentication are not supported for ThinkServer and System x M4 servers.Choose the type of credentials to use for the device and specify the appropriate credentials:
Use manually entered credentials
Specify the local user ID and password with lxc-supervisor authority for authenticating to the CMM.
(Optional) Specify a new password for the CMM user account if the password is currently expired on the device.
Use stored credentials
Select the stored credential with lxc-supervisor authority to use for this managed device. You can add stored credentials by clicking Manage Stored Credentials.
NoteIf you choose to use local authentication, you must select a stored credential to manage the device.
TipIt is recommended to use a supervisor or administrator account to manage the device. If an account with lower level authority is used, management might fail, or management might succeed but other futureXClarity Administrator operations on the device might fail (particularly if the device is managed without managed authentication). For more information about normal and stored credentials, see Managing user accounts and Managing stored credentials.
Specify the recovery password if managed authentication is selected.
A recovery account (RECOVERY_ID) is created on the CMM, and all local user accounts are disabled. If there is a problem with XClarity Administrator, and it stops working for some reason, you cannot log in to the CMM using normal user accounts. However, you can log in using the RECOVERY_ID account.
Note:
The recovery password is required if you choose to use managed authentication and is not allowed if you if you choose to use local authentication.
You can choose to use a local recovery account or stored recovery credentials. In either case, the user name is always RECOVERY_ID.
Ensure that the password follows the security and password policies for the device. Security and password policies might vary.
Ensure that you record the recovery password for future use.
For more information about the recovery ID, see Managing the authentication server.
Click Change to change the role groups that are to be assigned to the devices.
NoteYou can select from a list of role groups that are assigned to the current user.
If you do not change the role groups, the default role groups are used. For more information about the default role groups, see Changing the default permissions.
Click Manage.
A dialog is displayed that shows the progress of this management process. Monitor the progress to ensure that the process completes successfully.
When the process is complete, the dialog is displayed the number of devices in the chassis and the chassis status.
NoteSome inventory data is collected after the management process completes. The chassis is in the Pending status until all inventory data is collected. You cannot perform certain tasks on a managed device (such as deploying a server pattern) until all inventory data is collected for that device and the chassis is no longer in the Pending state.When the process is complete, click OK.
The device is now managed by XClarity Administrator, which automatically polls the managed device on a regular schedule to collect updated information, such as inventory.
If management was not successful due to one of the following error conditions, repeat this procedure using the Force management option.
If the managing XClarity Administrator failed and cannot be recovered.
NoteIf the replacementXClarity Administrator instance uses the same IP address as the failed XClarity Administrator, you can manage the device again using the RECOVERY_ID account and password (if applicable) and the Force management option. If the managing XClarity Administrator was taken down before the devices were unmanaged.
If the devices were not unmanaged successfully.
AttentionDevices can be managed by only oneXClarity Administrator instance at a time. Management by multiple XClarity Administrator instances is not supported. If a device is managed by one XClarity Administrator, and you want to manage it with another XClarity Administrator, you must first unmanage the device from the original XClarity Administrator, and then manage it with the new XClarity Administrator. If this is a new chassis, click Continue to Chassis Configuration to validate and change management network settings for the entire chassis (including compute nodes and Flex switches) and to configure the compute node information, local storage, I/O adapters, boot targets, and firmware settings by creating and deploying server patterns. For more information, see Modifying the management-IP settings for a chassis and Configuring servers using configuration patterns.
After you finish
- Discover and manage additional devices.
- Deploy operating-system images to the servers that do not already have an operating system installed. For more information, see Installing operating systems on bare-metal servers.
- Update firmware on devices that are not in compliance with current policies (Updating firmware on managed devices).
- Add the newly managed devices to the appropriate rack to reflect the physical environment (see Managing racks).
- Monitor hardware status and details (see Viewing the status of a managed server).
- Monitor events and alerts (see Working with events and Working with alerts).