Creating a custom OS-image profile
You can add custom device drivers, boot files (Windows only), configuration settings, unattend files, installation scripts, and software to a predefined OS-image profile that exists in the OS-images repository. When you add files to an OS image, Lenovo XClarity Administrator creates a custom profile for that OS image. The custom profile includes the custom files and installation options.
Before you begin
The custom files that you want to add must exist in the OS-images repository (see Importing boot files, Importing device drivers, Importing custom configuration settings, Importing custom unattend files, Importing custom installation scripts, and Importing custom software).
Procedure
To customize an OS image, complete the following steps.
- Select the predefined OS-image profile that you want to customize.
The Customization column identifies which OS images can be customized. Click the Help icon (
 ) for more information about the customization for a specific OS image.
Customizable. The OS image support customization but is not customized.
Non Customizable. The OS image does not support customization.
NoteYou can import additional base OS images (in .iso format) from a local or remote system by clicking theImport File icon (  ).
). - Click the Create Customized Profile icon (
 ). The New Custom OS Image dialog is displayed.
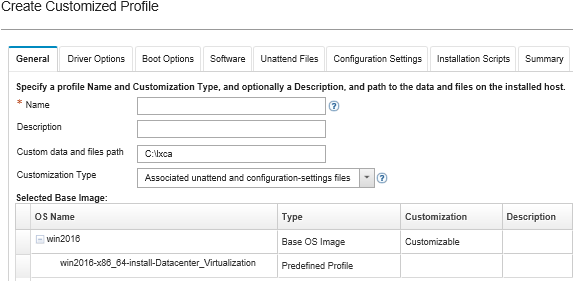
- On the Device Drivers tab, select the device drive that you want to add to the Linux OS-image profile.
For a list of supported formats, see Importing device drivers.
The selected file is applied after you complete the configuration wizard.
NoteYou can import additional device drivers from a local or remote system by clicking theImport File icon ( ). - On the Installation Scripts tab (if applicable), select the installation scripts that you want to add to the Windows OS-image profile. You can select at most one post-installation script.
For a list of supported formats, see Importing custom installation scripts.
The selected file is applied after you complete the configuration wizard.
NoteYou can import additional installation scripts from a local or remote system by clicking theImport File icon ( ). - On the Software tab, select the software that you want to add to the Linux OS-image profile.
For a list of supported formats, see Importing custom software.
The selected file is applied after you complete the configuration wizard.
NoteYou can import additional software from a local or remote system by clicking theImport File icon ( ).
After you finish
The customized OS images profile is listed under the base operating system on the OS Images tab on the Manage OS Images page.
Import a customized OS image profile and apply to a base OS image by clicking (see Importing a customized OS image profile).
Export a selected customized OS image profile by clicking .
Modify a selected customized OS image profile by clicking the Edit icon (
 ).
).Remove a selected customized OS image profile by clicking the Delete icon (
 ).
).