Deploying an operating-system image
You can use Lenovo XClarity Administrator to deploy an operating-system image to up to 28 servers concurrently.
Before you begin
Read the operating-system deployment considerations before you attempt to deploy operating systems on your managed servers (see Operating-system deployment considerations).
On the OS Images tab, ensure that the Deploy Status of the operating system that you want to deploy is set to Ready.
To deploy the Windows operating system, a WinPE boot file is required. If a matching WinPE file is not available, the Deploy Status is set to Not Ready
and the operating system cannot be deployed. You must manually download and import a WinPE file (see Importing boot files).
From the Manage OS Images tab, you can filter the list of OS images by clicking . You can filter the list to show only servers that have a status of Ready,
Not Ready,
and Warning
. Note that if the deployment status for an operating-system image is Not Ready,
the operating system is not included in the list of deployable operating systems.
The English locale is supported by default. To specify a language-specific locale, you must use a custom configuration file and unattend file. For more information, see Deploying SLES 12 SP3 with a configurable locale and NTP servers and Deploying Windows 2016 for Japanese .
Operating-system deployment to non-RAID attached storage is not supported.
For servers with XCC2 that have System Guard enabled and the action set to Prevent OS booting, ensure that System Guard is compliant on the device. If System Guard is not compliant, the devices are prevented from completing the boot process, which causes the OS deployment to fail. To provision these devices, manually respond to the System Guard boot prompt to allow the devices to boot normally.
Procedure
To deploy an operating-system image to one or more managed servers, complete the following steps.
- Select one or more servers to which the operating system is to be deployed. You can deploy an operating system on up to 28 servers at one time.
You can sort the table columns to make it easier to find specific servers. In addition, you can filter the list of displayed devices by selecting an option in the Show menu to list only devices in a specific chassis, rack, or group or by entering text (such as a name or IP address) in the Filter field.
TipYou can choose multiple compute nodes from multiple chassis if you intend to deploy the same operating system to all compute nodes.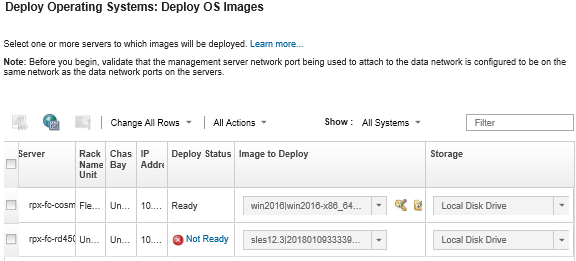
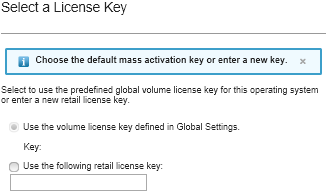
- For each server, click the License Key icon (
 ) and specify the license key to use to activate the operating system after it is installed.
XClarity Administrator supports default volume-license keys for Windows installations and individual retail keys for both Windows and VMware ESXi.
To use the global volume-license key that you specified in the Global Settings dialog, select Use the volume license key defined in Global Settings. For more information about global volume-license keys, see Configuring global OS-deployment settings.
To use an individual retail-license key, select Use the following retail license key, and enter the key in the following field.
- Optional: If you selected a Windows operating system for any server, you can join the Windows operating system to an Active Directory domain as part of the operating-system deployment by clicking the Folder icon (
 ) that is displayed next to the operating-system image, and then selecting the Active Directory name.
To use the default Active Directory that you specified in the Global Settings dialog, select Use the Active Directory defined in Global Settings. For more information about joining an Active Directory domain, see Integrating with Windows Active Directory.
To use an individual Active Directory, select Use the following Active Directory, and select the Active Directory domain.
- Click the Deploy images icon (
 ) to initiate the operating-system deployment.
If custom configuration settings were added to the OS-image profile, the Custom Settings tab is displayed on the Deploy OS Image dialog. Specify custom settings, common server settings, and specific server settings, and then click Next to continue with the OS deployment. Note that OS deployment will not proceed if input is not specified for any required custom configuration settings.
After you finish
You can monitor the status of the deployment process from the jobs log. From the XClarity Administrator menu, click . For more information about the job log, see Monitoring jobs.
You can also set up a remote-control session through the baseboard management controller for the server to watch the installation as it progresses. For more information about remote control, see Using remote control to manage Converged, Flex System, NeXtScale, and System x servers.
Deployment information is saved for the operating system. You can view the deployment information by clicking , and then hovering over the server name.