Deploying SLES 12 SP3 with custom packages and time zone
This scenario installs the SLES 12 SP3 operating system (in English) and several optional SLES packages. It also prompts for the time zone. A custom OS-image profile is used that includes a custom configuration file and custom unattend file. This custom profile can be selected on the Deploy OS Images page. Then, the SLE packages that you want to deploy can be selected and time zone can be specified on the Custom Settings tab. The selected values are substituted for the custom macros in the custom unattend, and the SLES autoyast installer uses those values in the unattend file to configure the operating system.
Before you begin
This scenario uses the following sample files.
SLES_installPackages_customConfig.json. This configuration file prompts for the time zone and optional SLES packages (Linux, Apache, MySQL, PHP software package, SLES mail server package, and SLES file server package) to install.
SLES_installPackages_customUnattend.xml This unattend file uses values in predefined macros and custom macros that are defined in the configuration file.
Procedure
To deploy SLES 12 SP3 to servers using a custom OS-image profile, complete the following steps.
- Download the base SLES operating system from the SUSE website to the local system, and import the image to the OS-images repository. For more information, see Importing operating-system images.
From the XClarity Administrator menu bar, click to display the Deploy Operating System: Manage OS Images page.
Click the OS Images tab.
Click Import icon (
 ).
).Click Local Import.
Click Browse to find and select the SLES 12 SP3 image to import (for example, SLE-12-SP3-Server-DVD-x86_64-GM-DVD1.iso).
Click Import to upload the image to the OS-images repository.
Wait for the import to complete. This might take a while.
- Create a custom configuration-settings file, and import the file to the OS-images repository.
The configuration-settings file is a JSON file that describe the data that needs to be gathered dynamically during the OS deployment process. For this scenario, we want to specify the optional SLES packages that can be installed (including SLES Linux, Apache, MySQL, PHP software package, SLES mail-server package, and SLES file-server package) and a time zone to use for each OS deployment. For more information about creating a configuration-settings file, see Custom macros.
To import the configuration-settings file, complete these steps. For more information, see Importing custom configuration settings.
Click the Configuration Files tab.
Click the Import icon (
).Click Local Import.
Select SLES for the operating system.
Click Browse to find and select the configuration-settings file to import (for example, SLES_installPackages_customConfig.json).
Click Import to upload the file to the OS-images repository.
NoteWhen you import a custom configuration-settings file,XClarity Administrator generates custom macros for each setting in the file. You can add those macros to the unattend file. During OS deployment, the macros are replaced with actual values.
- Modify the SLES unattend file to specify dynamic values for the optional SLES packages and time zone, and then import the custom file to the OS-images repository. For more information, see Importing custom unattend files.In the <general> section, add the time zone information, for example:
<strong className="ph b"><timezone>
   <hwclock></hwclock>
   <timezone></timezone>
</timezone></strong>
In the <patterns> section, add three pattern tags. These tags are used for the custom macros for the optional SLES package settings, for example:<patterns config:type="list">
<pattern>32bit</pattern>
<pattern>Basis-Devel</pattern>
<pattern>Minimal</pattern>
<pattern>WBEM</pattern>
<pattern>apparmor</pattern>
<pattern>base</pattern>
<pattern>documentation</pattern>
<pattern>fips</pattern>
<pattern>gateway_server</pattern>
<pattern>ofed</pattern>
<pattern>printing</pattern>
<pattern>sap_server</pattern>
<pattern>x11</pattern>
<strong className="ph b"> <pattern></pattern>
<pattern></pattern>
<pattern></pattern></strong>
</patterns>NoteThese tags are in the sample unattend file.
When you use a custom unattend file, XClarity Administrator does not provide many of the normal convenience features that you get when you use a predefined unattend file. For example, the targets <DiskConfiguration>, <ImageInstall>, <ProductKey>, and <UserAccounts> for Administrator, <Interfaces> for networking, and <package> list for installation features must be specified in the custom unattend file that is being uploaded.
To import the custom unattend file, complete these steps.
Click the Unattend Files tab.
Click the Import icon (
).Click Local Import.
Select SLES for the operating system.
Click Browse to find and select the unattend file to import (for example, SLES_installPackages_customUnattend.xml).
Click Import to upload the file to the OS-images repository.
NoteA warning that there are missing predefined macros in the unattend file is displayed. You can ignore the warning for now. You will add the predefined macros in the next stepClick Close in the warning dialog to open the Edit Unattend File dialog.
- Create a custom OS-image profile that includes the custom configuration-settings and unattend files. For more information, see Creating a custom OS-image profile.
Click the OS Images tab.
Select an OS-image profile to customize (for example, Basic).
Click Create icon (
 ) to display the Create Customized Profile dialog.
On the General tab:
Enter a name for the profile (for example, Custom SLES with optional packages).
Use the default value for the Custom data and file path field.
Select Associated unattend and configuration-settings files for the customization type.
Click Next.
On the Driver Options tab, click Next. The inbox device drivers are included by default.
On the Software tab, click Next.
On the Unattend Files tab, select the unattend file (for example, SLES_installPackages_customUnattend.xml), and click Next.
The associated configuration-settings file is automatically selected.
On the Installation Scripts tab, click Next.
On the Summary tab, review the settings.
Click Customize to create the custom OS-image profile.
- Deploy the custom OS-image profile to the target servers. For more information, see Deploying an operating-system image.
From the XClarity Administrator menu bar, click to display the Deploy Operating System: Deploy OS Images page.
For each target server:
Select the server.
Click , and specify the hostname, IP address, DNS, MTU and VLAN settings for the server.
TipVLAN settings are available only when VLAN mode is set in. Select the custom OS-image profile (for example, <base_OS>|<timestamp>_Custom SLES with optional packages) from the drop-down list in the Image to Deploy column
NoteEnsure that all target servers use the same custom profile.Select the preferred storage location where you want to deploy the operating system image from the Storage column.
NoteTo ensure that operating-system deployments are successful, detach all storage from the managed server except the storage that is chosen for the operating-system deployment.Verify that the deployment status for the selected server is Ready.
Select all target servers, and click the Deploy image icon (
 ) to initiate the operating-system deployment.
On the Custom Settings tab, click the Unattend and Configuration Settings subtab, and select the custom configuration-settings file (for example, SLES_installPackages_customConfig).
NoteThe associated custom unattend file is selected automatically.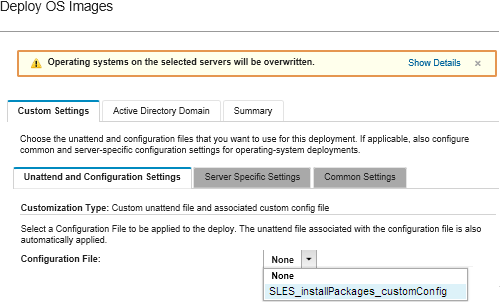
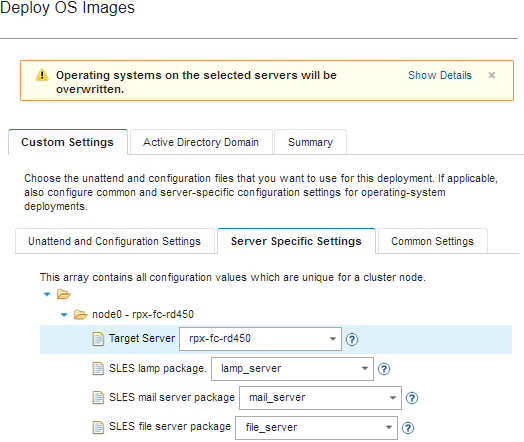
On the Server-Specific Settings subtab, select the target server and the optional SLES packages that you want to deploy.
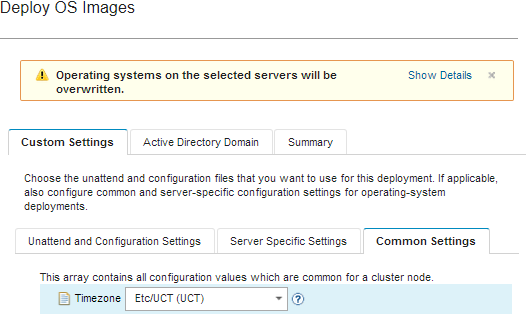
- On the Common Settings subtab, select the time zone to set for all target servers.
On the Summary tab, review the settings.
Click Deploy to deploy the operating system.