Deploying Windows 2016 for Japanese
This scenario installs the Windows 2016 operating system to multiple servers with Japanese enabled for the keyboard and operating-system locales. A custom profile is used that includes a custom WinPE boot file and unattend file. The custom profile can then be selected on the Deploy OS Images page.
Before you begin
This scenario uses the following sample files.
WinPE_64_ja.zip. This custom Windows boot (WinPE) file installs the Japanese locale.
Windows_locale_customUnattend.xml. This custom unattend file uses the WinPE file to install Japanese.
The server only has one visible disk (disk 0) and does not already have a system partition on it.
Static IPv4 mode is used and sets a static IP (which gets used in the custom unattend as a predefined macro).
Procedure
To deploy Japanese Windows 2016 to target servers using a custom OS-image profile, complete the following steps.
- Download the Japanese Windows 2016 operating system to the local system, and import the image to the OS-images repository. For more information, see Importing operating-system images.
From the XClarity Administrator menu bar, click to display the Deploy Operating System: Manage OS Images page.
Click the OS Images tab.
Click Import icon (
 ).
).Click Local Import.
Click Browse to find and select the OS image that you want to import (for example, ja_windows_server_2016_x64_dvd_9720230.iso).
Click Import to upload the image to the OS-images repository.
Wait for the import to complete. This might take a while.
- Download the bundle file for Windows 2016 to the local system, and import the image to the OS-images repository. For more information, see Importing device drivers.
The bundle file contains the latest device drivers and WinPE boot files that you can add to your custom OS-images profiles. This scenario uses a custom boot file, so the boot file in the bundle will not be used.
Click the Driver Files tab.
Click to go to the Lenovo Support webpage, and download the bundle file for Windows 2016 to the local system.
Click Import icon (
).Click Local Import.
Click Browse to find and select the OS image that you want to import (for example, bundle_win2016_20180126130051.zip).
Click Import to upload the file to the OS-images repository.
Wait for the import to complete. This might take a while.
- Optional: Create a custom WinPE boot file that uses the Japanese locale during the WinPE install, and import the file to the OS-images repository.
XClarity Administrator uses a predefined Windows PreInstallation (WinPE) boot file to install the Windows operating system. The locale that is used with this predefined boot file is English (en-US). If you want to change the locale that is used during Windows Setup, you can create a custom WinPE boot file with the desired locale and assign that custom boot file to your custom profile.
For information about injecting locales into WinPE, see the Windows WinPE: Add packages webpage.
ImportantSpecifying a non-English locale in the WinPE boot file does not change the locale of the final OS being deployed. It only changes the locale that is shown during Windows install and setup.To create a custom WinPE boot file that includes the Japanese locale, complete these steps. For more information, see Creating a boot (WinPE) file.Using a user ID with administrator authority, run the Windows ADK command
Deployment and Imaging Tools Environment.
A command session is displayed.From the command session, change to the directory where the genimage.cmd and starnet.cmd files were downloaded (for example, C:\customwim).
- Ensure that no previously mounted images are on the host by running the following command:
dism /get-mountedwiminfoIf there are mounted images, discard them by running the following command:
dism /unmount-wim /MountDir:C:\<mount_path> /Discard If you are adding in-box device drivers to a customized Windows profile, copy the raw device-driver files, in .inf format, to the host system in the C:\drivers directory.
Run the following command to generate the boot file, in .wim format, and then wait a few minutes for the command to complete.
genimage.cmd amd64 <ADK_Version>Where <ADK_Version> is one of the following values.8.1. For Windows 2012 R2
10. For Windows 2016
This command creates a boot file named C:\WinPE_64\media\Boot\WinPE_64.wim.
Mount the boot file by running the following command:
DISM /Mount-Image /ImageFile:C:\WinPE_64\media\Boot\WinPE_64.wim /index:1 /MountDir:C:\WinPE_64\mountIf you are adding out-of-box device drivers directly to the boot file, complete the following steps.
Create the following directory structure, where <os_release> is 2012R2, or 2016
drivers\<os_release>\Copy the device drivers, in .inf format, to a directory inside that path, for example:
drivers\<os_release>\<driver1>\<driver1_files>Copy the drivers directory to the mount directory, for example:
C:\WinPE_64\mount\drivers
Optional: Make additional customizations to the boot file, such as adding folders, files, startup scripts, language packs, and apps. For more information about customizing boot files, see the WinPE: Mount and Customize website.
Add the Japanese packages, for example.
View installed packages to ensure that the Japanese-specific packages are installed.
Dism /Add-Package /Image:"C:\WinPE_64\mount"
/PackagePath="C:\Program Files (x86)\Windows Kits\10\Assessment
and Deployment Kit\Windows Preinstallation Environment\amd64\WinPE_OCs\ja-jp\lp.cab"
/PackagePath="C:\Program Files (x86)\Windows Kits\10\Assessment and Deployment Kit\Windows
Preinstallation Environment\amd64\WinPE_OCs\ja-jp\WinPE-DismCmdlets_ja-jp.cab"
/PackagePath="C:\Program Files (x86)\Windows Kits\10\Assessment and Deployment Kit\Windows
Preinstallation Environment\amd64\WinPE_OCs\ja-jp\WinPE-NetFx_ja-jp.cab"
/PackagePath="C:\Program Files (x86)\Windows Kits\10\Assessment and Deployment Kit\Windows
Preinstallation Environment\amd64\WinPE_OCs\ja-jp\WinPE-PowerShell_ja-jp.cab"
/PackagePath="C:\Program Files (x86)\Windows Kits\10\Assessment and Deployment Kit\Windows
Preinstallation Environment\amd64\WinPE_OCs\ja-jp\WinPE-RNDIS_ja-jp.cab"
/PackagePath="C:\Program Files (x86)\Windows Kits\10\Assessment and Deployment Kit\Windows
Preinstallation Environment\amd64\WinPE_OCs\ja-jp\WinPE-Scripting_ja-jp.cab"
/PackagePath="C:\Program Files (x86)\Windows Kits\10\Assessment and Deployment Kit\Windows
Preinstallation Environment\amd64\WinPE_OCs\ja-jp\WinPE-StorageWMI_ja-jp.cab"
/PackagePath="C:\Program Files (x86)\Windows Kits\10\Assessment and Deployment Kit\Windows
Preinstallation Environment\amd64\WinPE_OCs\ja-jp\WinPE-WDS-Tools_ja-jp.cab"
/PackagePath="C:\Program Files (x86)\Windows Kits\10\Assessment and Deployment Kit\Windows
Preinstallation Environment\amd64\WinPE_OCs\ja-jp\WinPE-WMI_ja-jp.cab"
/PackagePath="C:\Program Files (x86)\Windows Kits\10\Assessment and Deployment Kit\Windows
Preinstallation Environment\amd64\WinPE_OCs\WinPE-FontSupport-JA-JP.cab"
Review the International Settings in the image.
Dism /Get-Packages /Image:"C:\WinPE_64\mount"Unmount the image by running the following command.
DISM /Unmount-Image /MountDir:C:\WinPE_64\mount /commitCompress the contents of the C:\WinPE_64\media directory into a zip file called WinPE_64_ja.zip.
Import the .zip file into XClarity Administrator (see Importing boot files).
Click the Boot Files tab.
Click Import icon (
).Click Local Import.
Select Windows for the operating system.
Click Browse to find and select the custom boot file (for example, WinPE_64_ja.zip).
Click Import to upload the file to the OS-images repository.
- Modify the Windows unattend file to specify that Japanese is included in the OS image, and import the custom file to the OS-images repository.In the
windowsPE
pass of the Windows install, add the Japanese as the operating-system language and the locale, for example:<settings pass="windowsPE">
<component name="Microsoft-Windows-International-Core-WinPE" processorArchitecture="amd64"
publicKeyToken="31bf3856ad364e35" language="neutral" versionScope="nonSxS"
xmlns:wcm="http://schemas.microsoft.com/WMIConfig/2002/State"
xmlns:xsi="http://www.w3.org/2001/XMLSchema-instance">
<SetupUILanguage>
<UILanguage>ja-JP</UILanguage>
</SetupUILanguage>
<SystemLocale>ja-JP</SystemLocale>
<UILanguage>ja-JP</UILanguage>
<UserLocale>ja-JP</UserLocale>
<InputLocale>0411:00000411</InputLocale>
</component>
</settings>NoteWhen you use a custom unattend file,XClarity Administrator does not provide many of the normal convenience features that you get when you use a predefined unattend file. For example, the targets <DiskConfiguration>, <ImageInstall>, <ProductKey>, and <UserAccounts> for Administrator, <Interfaces> for networking, and <package> list for installation features must be specified in the custom unattend file that is being uploaded. XClarity Administrator provides some basic convenience macros, such as OOB driver injection, status reporting, post-install scripts, custom software. However, to take advantage of these predefine macros, you must specify the following macros in the custom unattend file.
- #predefined.unattendSettings.preinstallConfig#
- #predefined.unattendSettings.postinstallConfig#
The example file already contains the required macros. For more information about adding macros to unattend files, see Injecting predefined and custom macros to an unattend file. For more information about available predefined macros, see Predefined macros.
To import the custom unattend file, complete these steps. For more information, see Importing custom unattend files.
Click the Unattend Files tab.
Click Import icon (
).Click Local Import.
Select Windows for the operating system.
Click Browse to find and select the custom unattend file (for example, Windows_locale_customUnattend.xml).
Click Import to upload the file to the OS-images repository.
- Create a custom OS-image profile that includes the custom boot (WinPE) file and unattend file. For more information, see Creating a custom OS-image profile.
Click the OS Images tab.
Select the profile to customize (for example, win2016-x86_64-install-Datacenter_Virtualization).
Click Create icon (
 ) to display the Create Customized Profile dialog.
On the General tab:
Enter a name for the profile (for example, Custom Windows for Japanese profile).
Use the default value for the Custom data and file path field.
Select Only unattend files for the customization type.
Click Next.
On the Driver Options tab, click Next. The inbox device drivers are included by default.
On the Boot Files tab, select custom boot file (for example, WinPE_64_ja), and click Next.
On the Software tab, click Next.
On the Unattend Files tab, select custom unattend file (for example, Windows_locale_customUnattend.xml), and click Next.
On the Installation Scripts tab, click Next.
On the Summary tab, review the settings.
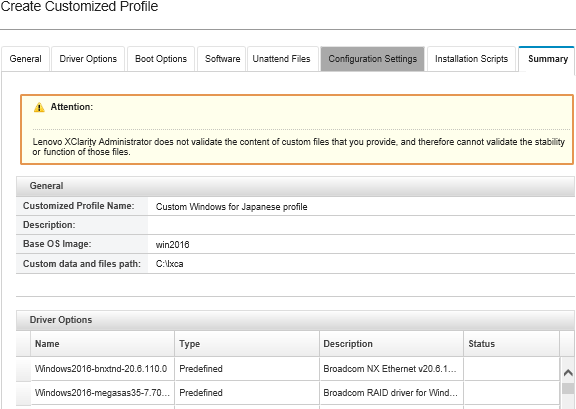
Click Customize to create the custom OS-image profile.
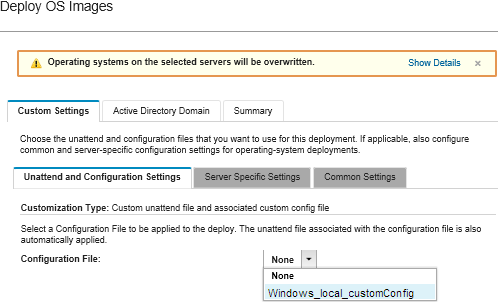
- Deploy the custom OS-image profile to the target servers. For more information, see Deploying an operating-system image.
From the XClarity Administrator menu bar, click to display the Deploy Operating System: Deploy OS Images page.
For each target server:
Select the server.
Click , and specify the hostname, IP address, subnet mask, gateway, DNS, MTU and VLAN settings for the server.
TipVLAN settings are available only when VLAN mode is set in. Select the custom OS-image profile (for example, <base_OS>|<timestamp>_Custom Windows for Japanese profile) from the drop-down list in the Image to Deploy column.
NoteEnsure that all target servers use the same custom profile.(Optional) Click the License Key icon (
 ) and specify the license key to use to activate the operating system after it is installed.
Select the preferred storage location where you want to deploy the operating system image from the Storage column.
NoteTo ensure that operating system deployments are successful, detach all storage from the managed server except the storage that is chosen for the operating-system deployment.Verify that the deployment status for the selected server is Ready.
Select all target servers, and click the Deploy image icon (
 ) to initiate the operating-system deployment.
On the Custom Settings tab, click the Unattend and Configuration Settings subtab, and select the custom unattend file (for example, Windows_locale_customUnattend.xml).
(Optional) On the Active Directory Domain tab, specify information to join an Active Directory domain as part of a Windows image deployment (see Integrating with Windows Active Directory).
On the Summary tab, review the settings.
Click Deploy to deploy the operating system.
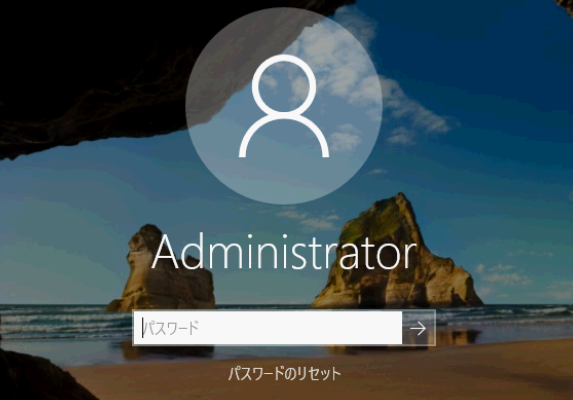
The Windows installation dialog is displayed in Japanese.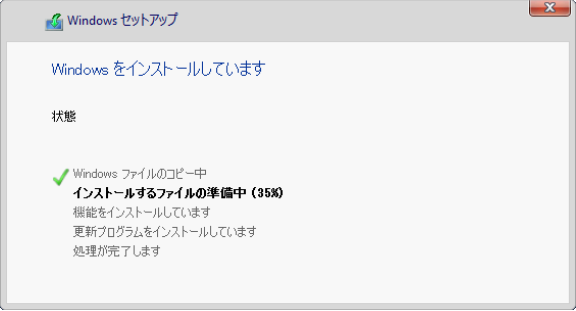 After installation is complete, the Windows login page also displayed in Japanese.