Importing device drivers
You can import individual device drivers and bundles files into the OS images repository. These files can then be used to customize Linux and Windows images.
About this task
You must ensure that the operating-system image that you intend to deploy includes the appropriate Ethernet, Fibre Channel, and storage adapter device drivers for your hardware. If the I/O adapter device driver is not included in the operating system image or profile, the adapter is not supported for OS deployment. You can create custom OS-image profiles that include the out-of-box device drivers that you need.
In-box device drivers. XClarity Administrator does not manage in-box device drivers. Always install the latest operating system to ensure that you have the latest in-box device drivers that you need.
NoteYou can add in-box device drivers to a customized Windows profile by creating a custom WinPE boot file and copying the device-driver files to the host system in theC:\drivers directory. When you create a custom OS-images profile that uses the custom boot-file, the device drivers that are in the C:\drivers directory are included in both WinPE and the final OS. They are treated as though they were inbox. Therefore, you do not need to import these in-box device drivers into XClarity Administrator when you specify device drivers to use in the custom OS-images profile creation. Predefined device drivers. For ThinkSystem servers, XClarity Administrator is preloaded with a set of out-of-box device drivers for Linux to enable the installation of the operating system as well as basic network and storage configuration for the final operating system. You can add these predefined device drivers to your custom OS-image profiles, and then deploy the profiles to your managed servers
Lenovo also bundles sets of predefined device drivers into a single package that can be downloaded from the Lenovo Windows drivers and WinPE Images Repository webpage and then imported into OS-images repository. Currently, the bundle files are available only for Windows. If the bundle file contains both device drivers and boot files, you can import the bundle file from the Device Driver or Boot Image tab.
NoteBy default, the predefined OS-image profiles include the predefined device drivers.
You cannot delete predefined device drivers that were loaded when you installed XClarity Administrator; however, you can delete predefined device drivers that were imported from a Lenovo bundle.
XClarity Administrator requires that imported bundle files be signed by Lenovo. When importing a bundle file, an .asc signature file must also be imported.
Custom device drivers. You can import out-of-box device drivers into the OS-images repository, and then add those device drivers to a custom OS-image profile.
You can obtain device drivers from the Lenovo YUM Repository webpage, from the vendor (such as Red Hat), or through a custom device driver that you generated yourself. For some Windows device drivers, you can generate a custom device driver by extracting the device driver from the installation .exe to your local system and creating a .zip archive file.
The following file types are supported for importing custom device drivers.Operating system Supported Device Driver File Types CentOS Linux Not supported Microsoft® Windows® Azure Stack HCI Not supported Microsoft Windows Hyper-V Server A .zip file containing the raw device-driver files, which are typically grouping of .inf, .cat, and .dll files. Microsoft Windows Server A .zip file containing the raw device-driver files, which are typically grouping of .inf, .cat, and .dll files. Red Hat® Enterprise Linux (RHEL) Server Driver update disk (DUD) in either an .rpm or .iso image format NoteIf you apply a DUD .rpm to the custom profile, the .rpm is installed only to the final operating system. It is not installed in the install environment (initrd). To install a custom device driver to the initrd, import a DUD .iso and apply the .iso to the custom profile.Rocky Linux Not supported SUSE® Linux Enterprise Server (SLES) Driver update disk (DUD) in .rpm or .iso image format NoteIf you apply a DUD .rpm to the custom profile, the .rpm is installed only to the final operating system. It is not installed in the install environment (initrd). To install a custom device driver to the initrd, import a DUD .iso and apply the .iso to the custom profile.Ubuntu Not supported VMware vSphere® Hypervisor (ESXi) with Lenovo Customization Device drivers in .vib image format NoteThe OS images repository can store an unlimited number of predefined and custom files, if space is available to store the files.
Procedure
To import a Windows bundle file that contains device-drivers into the OS images repository, complete the following steps.
From the XClarity Administrator menu bar, click to display the Deploy Operating System: Manage OS Images page.
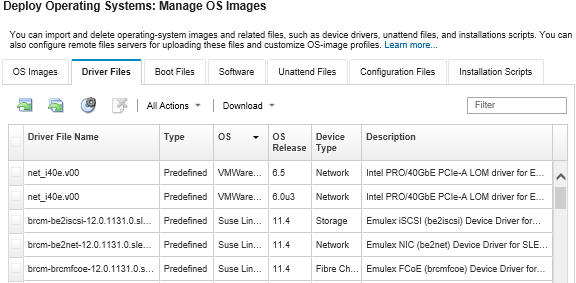
Click the Driver File tab.
Click to go to the Lenovo Support webpage, and download the appropriate bundle file and the associated signature file for the OS image to the local system.
Click the Import Bundle File icon (
 ). The Import Bundle File dialog is displayed.
Click the Local Import tab to upload files from the local system, or click the Remote Import tab to upload files from a remote file server.
NoteTo upload a file from a remote file server, you must first create a remote file-server profile by clicking theConfigure File Server icon (  ). For more information, see
 Configuring a remote file server. If you chose to use a remote file server, select the server that you want to use from the Remote File Server list.
Select the operating-system type and release.
Enter the file name for the bundle file and the associated signature file or click Browse to find the files that you want to import.
Optional: Enter a description for the bundle file.
Click Import.
TipThe file is uploaded over a secure network connection. Therefore, network reliability and performance affects how long it takes to import the file.If you close the web browser tab or window in which the file is being uploaded locally before the upload completes, the import fails.
- To import an individual device driver into the OS images repository, complete the following steps.
From the XClarity Administrator menu bar, click to display the Deploy Operating System: Manage OS Images page.
Click the Driver Files tab.
Click the Import File icon (
 ). The Import File dialog is displayed.
Click the Local Import tab to upload files from the local system, or click the Remote Import tab to upload files from a remote file server.
NoteTo upload a file from a remote file server, you must first create a remote file-server profile by clicking theConfigure File Server icon ( ). For more information, see Configuring a remote file server. If you chose to use a remote file server, select the server that you want to use from the Remote File Server list.
Select the operating-system type and release.
Enter the file name or click Browse to find the device driver that you want to import.
Optional: Enter a description for the device driver.
Optional: Select a checksum type to verify that the file being uploaded is not corrupt, and copy and paste the checksum value in the provided text field.
If you select a checksum type, you must specify a checksum value to check the integrity and security of the uploaded file. The value must come from a secure source from an organization that you trust. If the uploaded file matches with the checksum value, it is safe to proceed with deployment. Otherwise, you must upload the file again or check the checksum value.
Three checksum types are supported:MD5
SHA1
SHA256
Click Import.
TipThe file is uploaded over a secure network connection. Therefore, network reliability and performance affects how long it takes to import the file.If you close the web browser tab or window in which the file is being uploaded locally before the upload completes, the import fails.
After you finish
The device-drive image is listed on the Driver Files tab on the Manage OS Images page.
From this page, you can perform the following actions.
Create a remote-file-server profile by clicking the Configure File Server icon (
).Remove a selected device driver by clicking the Delete icon (
 ).
).Add a device driver to an customized OS image profile (see Creating a custom OS-image profile).