Managing racks
You can use racks in Lenovo XClarity Administrator to group your managed devices to reflect the physical rack setup in your datacenter.
Before you begin
After moving a node from one chassis to another, wait 5 to 10 minutes before attempting to edit the racks in XClarity Administrator that contains the chassis.
When you move a device out of a rack, the rack name and lowest rack unit values are cleared in device inventory. The room and location values are not cleared.
Some devices restrict the rack name to a maximum of 47 characters. If the rack name exceeds the maximum length for those devices, some functions might fail (such as OS deployment, server configuration using configuration patterns and server profiles).
About this task
This procedure describes how to create and populate a single rack with managed devices and fillers interactively.
If you must add many devices to racks, or edit many racks, consider using a spreadsheet to perform a bulk import or implementing a PowerShell script to automate the task. For more information about using the bulk-import, see Managing chassis and Managing servers. For information about PowerShell scripts, see PowerShell (LXCAPSTool) toolkit.
XClarity Administrator recognizes rack properties that are defined in a manageable device. When you manage that device, XClarity Administrator sets the system properties for that device and updates the rack view. If the rack does not exist in XClarity Administrator, a new rack is created and the device is added to the new rack.
System x3500 M5 servers, NeXtScale nx360 M5 servers, ThinkServer SD350 servers, and tower servers are not supported in rack view.
System x3850 X5 scalable-complex systems, you must add each node (server) to the rack individually.
Demo hardware is not persistent in rack views when XClarity Administrator is restarted.
Procedure
To create and populate racks, complete the following steps.
Create and populate a single rack with managed devices.
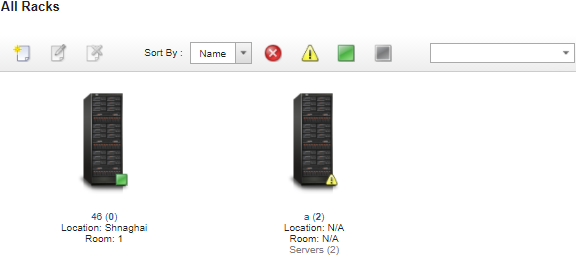
From the XClarity Administrator menu bar, click . The All Racks page is displayed.
The All Racks page shows each rack as a thumbnail image with the name of the rack, the number of managed devices that are in the rack, and the status of the device with the highest severity.
NoteYou can filter the racks by severity by clicking the following icons in the toolbar. You can also enter a rack name in theFilter field to further filter the racks that are displayed. - Critical alerts icon (
 )
) - Warning alerts icon (
 )
) - Normal alerts icon (
 )
)
- Critical alerts icon (
Click the Create icon (
 ) to create an empty rack. The Create Empty Rack dialog is displayed.
Fill in the dialog with the rack name, height, location, and room.
NoteRack names do not need to be unique. You can create racks with the same name as long as the location or room or both are different.
The rack name can include only the upper and lower case letters, numbers, and the following special characters: period (.), dash (-), and underscore (_).
The location can be a maximum of 23 characters.
Click Create. A thumbnail image for the new rack is added to the All Racks page.
Double-click the thumbnail image for the rack. The rack-view page is displayed with an empty rack image and properties for that rack.
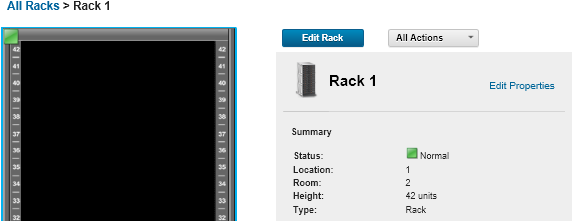
Click Edit Rack to display the Edit Rack page.
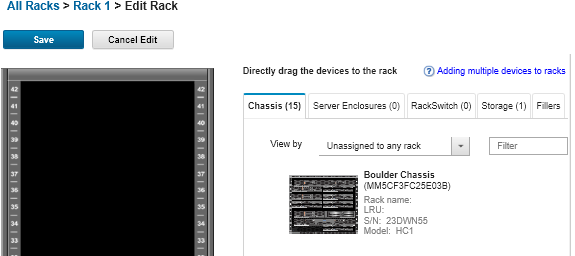
Add all appropriate managed devices and fillers to the graphical view:
NoteOnly managed devices that are in an Online state can be added to the rack.Click the Chassis tab to view a list of managed chassis that have not been added to a rack. Drag and drop a managed chassis to the desired location in the rack to add the chassis to the rack.
Click the Server Enclosures tab to view a list of managed rack-servers and multi-node server enclosures that have not been added to a rack. Drag and drop a rack server or server enclosures into the rack at the desired location to add the rack server to the rack.
Click the RackSwitch tab to view a list of managed RackSwitch switches that have not been added to a rack. Drag and drop a RackSwitch switch into the rack at the desired location to add the switch to the rack.
Click the Storage tab to view a list of various storage devices. Drag and drop the appropriate storage device into the rack at the desired location to add the storage device to the rack.
Click the Fillers tab to view a list of various fillers. Drag and drop the appropriate filler into the rack at the desired location to add the filler to the rack.
A filler is any device that is in the rack that is not managed by XClarity Administrator. The following fillers are available:- Generic fillers
- Generic rack switches
- Storage controllers and enclosures
- Partner storage controllers and enclosures (such as IBM, NetApp, and EMC)
Tips- The location, room, rack, and lowest rack unit properties are updated for the device when you add or remove devices from a rack.
- You can sort the list of devices on each tab by using the View by drop-down list. In addition, you can enter text (such as a name or IP address) in the Filter field to further filter the devices that are displayed.
- You can remove managed devices and fillers from the rack by dragging and dropping the objects outside the rack.
Click Save to save the rack configuration.
The configuration process might take several minutes to complete. During configuration, the rack and location information is pushed to the CMM or baseboard management controller for the managed devices.
Customize the fillers that you added to the rack by clicking the filler and then clicking Edit Properties. In the Edit Properties dialog, you can specify a name, lowest rack unit (LRU), and a URL to use to launch the management user interface for that device.
TipAfter the rack configuration is saved, you can launch the management user interface for a filler by clicking the filler in the rack and then clicking theLaunch URL link.
Create and populate racks using a bulk-import file.
From the XClarity Administrator menu bar, click . The Discover and Manage page is displayed.
Click Bulk Import. The Bulk Import wizard is displayed.
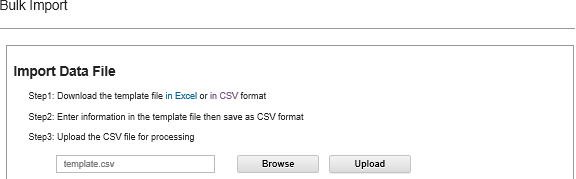
Click the in Excel or in CSV link on the Import Data File page to download the template bulk-import file in Excel or CSV format.
ImportantThe template file might change from one release to the next. Ensure that you always use the latest template.Fill in the data worksheet in the template file, and save the file in CSV format.
TipThe Excel template includes aData worksheet and a Readme worksheet. Use the Data worksheet to fill in your device data. The Readme worksheet provides information about how to fill in each field on the Data worksheet (including which fields are required) and sample data. ImportantDevices are managed in the order that is listed in the bulk-import file.
XClarity Administrator uses rack-assignment information that is defined in the device configuration when the device is managed. If you change the rack assignment in XClarity Administrator, XClarity Administrator updates the device configuration. If you update the device configuration after the device is managed, the changes are reflected in XClarity Administrator.
It is recommended but not required to explicitly create a rack in the spreadsheet before assigning the rack to a device. If a rack is not explicitly defined and the rack does not already exist in XClarity Administrator, the rack-assignment information that is specified for a device is used to create the rack with a default height of 52U.
If you want to use another height for the rack, you must explicitly define the rack in the spreadsheet before assigning it to a device.
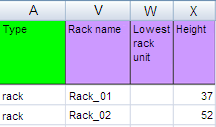
To define your racks in the bulk-import file, complete the following required columns.(Columns A) Specify
rack
for the device type.(Columns V) Specify the rack name.
(Column X) Specify rack height. The following rack heights are supported: 6U, 12U, 18U, 25U, 37U, 42U, 45U, 46U, 48U, 50U, and 52U.
The following figure shows an example bulk-import file with racks defined.
 NoteYou can use the same bulk-import file to manage devices and add those devices to a rack (see
Managing devices). From the Bulk Import wizard, enter the name of the CSV file to upload file for processing. You can click Browse to help you find the file.
Click Upload to upload and validate the file.
Click Next to display the Input Summary page with a list of rack and other devices to be managed, and review the summary of racks and other devices that you want to manage.
Click Next to display the Device Credentials page. Click on each tab, and optionally specify global settings and credentials to use for all devices of a specific type. The devices that will use the global settings and credentials are listed on right side of each tab.
Click Manage. The Monitoring Results page is displayed with information about the management status of each device in the bulk-import file.
A job is created for the management process. If you close the Bulk-Import wizard, the management process continues running in the background. You can monitor the status of the management process from the jobs log. For information about the jobs log, see Monitoring jobs.
After you finish
You can change the rack numbering order preference (see Setting inventory preferences).