Managing switches
Lenovo XClarity Administrator can manage network switches.
Before you begin
Certain ports must be available to communicate with the switches. Ensure that all required ports are available before you attempt to manage a switch. For information about ports, see Port availability.
Ensure that the minimum required firmware is installed on each switch that you want to manage using XClarity Administrator. You can find minimum required firmware levels from the XClarity Administrator Support – Compatibility webpage by clicking the Compatibility tab and then clicking the link for the appropriate device types.
Ensure that you create stored credentials in XClarity Administrator before you manage rack switches. XClarity Administrator uses only stored credentials to authenticate to the rack switches. The stored credential must match an active user account on the device. You can create stored credentials from the management dialogs or from the Stored Credentials page. For more information, see Managing stored credentials.
Management using loopback interfaces is supported for all RackSwitch devices. Ensure that XClarity Administrator has connectivity to the loopback interface, either by adding a static route or advertising the address via a routing protocol. Note that routing cannot be performed between the management port and any data ports (including loopback).
FOS 8.2.3 or later is required
Ensure that you configure the SNMPv3 user at index 1 on the switch before managing the switch by running the following command on the switch: snmpconfig --add snmpv3 -index 1 -user snmpadmin1 -groupname rw
Ensure that REST is enabled on the switch. To enable REST, run the following command: mgmtapp --enable rest
Ensure that the number of allowed REST sessions is 10. To set the REST session count, run the following command: mgmtapp --config -maxrestsession 10
Lenovo ThinkSystem DB series switches are not discoverable using service discovery protocols. To manage these switches, use the Manual Input option, clear User service discovery protocols to identify device type, and then select
Lenovo ThinkSystem DB Series Switch
from the Device Type list. For more details, see the procedure below about discovering and managing switches that are not on the same IP subnet as XClarity Administrator.
Cumulus 4.3 or later is required
NVIDIA switches are not discoverable using service discovery protocols. To manage these switches, use the Manual Input option, clear User service discovery protocols to identify device type, and then select “NVIDIA Switch” from the Device Type list. For more details, see the procedure below about discovering and managing switches that are not on the same IP subnet as XClarity Administrator.
About this task
XClarity Administrator can automatically discover RackSwitch switches in your environment by probing for manageable devices that are on the same IP subnet as XClarity Administrator. To discover switches that are in other subnets, specify an IP address or range of IP addresses, or import information from a spreadsheet.
After the switches are managed by XClarity Administrator, XClarity Administrator polls each managed switch periodically to collect information, such as inventory, vital product data, and status. You can view and monitor each managed switch and perform management tasks such as launching the management console, and powering on and off.
If the XClarity Administrator looses communication with the switch (for example, due to power loss or network failure or if the switch is offline) while collecting inventory during the management process, the management completes successfully; however, some inventory information might be incomplete. Either wait for the switch to come online and for XClarity Administrator to poll the switch for inventory or manually collect inventory on the switch from the Switches page by selecting the switch and clicking .
Management tasks are also disabled for Flex switches that are in protected mode.
A device can be managed by only one XClarity Administrator instance at a time. Management by multiple XClarity Administrator instances is not supported. If a device is managed by one XClarity Administrator, and you want to manage it with another XClarity Administrator, you must first unmanage the device on the initial XClarity Administrator, and then manage it with the new XClarity Administrator. If an error occurs during the unmanagement process, you can select the Force management option during management on the new XClarity Administrator.
When a switch is managed either directly using SSH or indirectly through a CMM, the switch is identified as managed by XClarity Administrator, necessary configuration is performed for interaction, and inventory is collected.
Procedure
Complete one of the following procedures to manage your RackSwitch switches using XClarity Administrator.
Discover and manage a large number of switches and other devices using a bulk-import file (see Managing devices).
Discover and manage RackSwitch switches that are on the same IP subnet as XClarity Administrator.
From the XClarity Administrator menu bar, click . The Discover and Manage New Devices page is displayed.
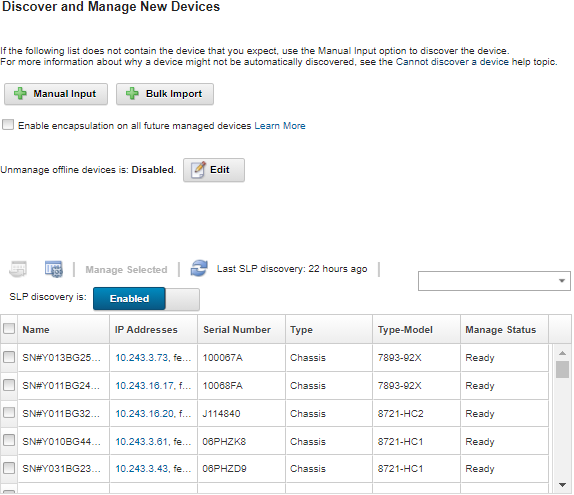
You can sort the table columns to make it easier to find the switches that you want to manage. In addition, you can enter text (such as a name or IP address) in the Filter field to further filter the switches that are displayed. You can change the columns that are displayed and the default sort order by clicking the Customize Columns icon (
 ).
).Click the Refresh icon (
 ) to discover all manageable devices in the XClarity Administrator domain. Discovery might take several minutes.
Select one or more switches that you want to manage.
Click Manage Selected.
Specify the stored credentials for authenticating to the switches.
TipClick Manage Stored Credentials to create and managed stored credentials in XClarity Administrator (see Managing stored credentials).
It is recommended to use a supervisor or administrator account to manage the device. If an account with lower level authority is used, management might fail, or management might succeed but other future XClarity Administrator operations on the device might fail (particularly if the device is managed without managed authentication).
(Switches running ENOS only) If set, specify the
enable
password that is used to enter Privileged Exec Mode on the switch.When you manage a RackSwitch switch running ENOS, access to Privileged Exec Mode on the switch is required. This is used by XClarity Administrator when issuing the
enable
command to the switch. By default, there is no password set for this command on the switch. However, if the switch administrator configured a password for this command for added security, it must be specified for XClarity Administrator to manage the switch successfully.Optional: (Switches running ENOS only) Choose whether to enable HTTPS on the switch by clicking Advanced and then selecting Enable HTTPS. This is enabled by default.
NoteFor switches running CNOS, HTTPS must be enabled on the switch before management (see Switch management considerations).
If you choose not to enable HTTPS, the current setting on the switch is used.
When the switch is ununmanaged, XClarity Administrator restores HTTPS to the original setting.
Optional: Choose whether to replace the NTP configuration on the switch with the NTP configuration and time zone settings that are defined for Lenovo XClarity Administrator by clicking Advanced and then selecting Configure NTP clients to use the NTP settings from the management server. This is enabled by default.
NoteIf you choose not to replace the NTP configuration and time zone, the timestamp for log entries and events might become out of synch between the managed switch and the management server.
When the switch is ununmanaged, XClarity Administrator restores NTP configuration and time zone to the original settings.
Click Change to change the role groups that are to be assigned to the devices.
NoteYou can select from a list of role groups that are assigned to the current user.
If you do not change the role groups, the default role groups are used. For more information about the default role groups, see Changing the default permissions.
Click Manage.
A dialog is displayed that shows the progress of this management process. To ensure that the process completes successfully, monitor the job progress.
When the process is complete, click OK.
The device is now managed by XClarity Administrator, which automatically polls the managed device on a regular schedule to collect updated information, such as inventory.
If management was not successful due to one of the following error conditions, repeat this procedure using the Force management option.
If the managing XClarity Administrator failed and cannot be recovered.
NoteIf the replacementXClarity Administrator instance uses the same IP address as the failed XClarity Administrator, you can manage the device again using the RECOVERY_ID account and password (if applicable) and the Force management option. If the managing XClarity Administrator was taken down before the devices were unmanaged.
If the devices were not unmanaged successfully.
AttentionDevices can be managed by only oneXClarity Administrator instance at a time. Management by multiple XClarity Administrator instances is not supported. If a device is managed by one XClarity Administrator, and you want to manage it with another XClarity Administrator, you must first unmanage the device from the original XClarity Administrator, and then manage it with the new XClarity Administrator.
Discover and manage RackSwitch switches that are not on the same IP subnet as XClarity Administrator by manually specifying IP addresses:
From the Lenovo XClarity Administrator menu bar, click . The Discover and Manage page is displayed.
Select Manual Input.
Specify the network addresses of the switches that you want to manage:
- Click Single System, and enter a single IP address domain name, or fully-qualified domain name (FQDN).Network AccessTo specify an FQDN, ensure that a valid domain name is specified on
page (see Configuring network access). - Click Multiple Systems, and enter a range of IP addresses. To add another range, click the Add icon (
 ). To remove a range, click the Remove icon (
 ).
).
- Click Single System, and enter a single IP address domain name, or fully-qualified domain name (FQDN).
If the device type is not discoverable using service discovery protocols, clear User service discovery protocols to identify device type, and then select the type of device to be managed from the drop-down list.
Service discovery protocols, such as SLP and SSDP, enable XClarity Administrator to automatically discover the type of the device that is about to be managed and then use the appropriate mechanism to manage the device. Some device types do not support service discovery protocols, and in some environments, service discovery protocols are purposely turned off. In either case, you must choose the appropriate device type to complete the manage process. The following device types must be explicitly identified.- Lenovo ThinkSystem DB Series Switch
- NVIDIA Mellanox Switch
Click OK.
Specify the stored credentials for authenticating to the switches.
TipClick Manage Stored Credentials to create and managed stored credentials in XClarity Administrator (see Managing stored credentials).
It is recommended to use a supervisor or administrator account to manage the device. If an account with lower level authority is used, management might fail, or management might succeed but other future XClarity Administrator operations on the device might fail (particularly if the device is managed without managed authentication).
(Switches running ENOS only) If set, specify the
enable
password that is used to enter Privileged Exec Mode on the switch.When you manage a RackSwitch switch running ENOS, access to Privileged Exec Mode on the switch is required. This is used by XClarity Administrator when issuing the
enable
command to the switch. By default, there is no password set for this command on the switch. However, if the switch administrator configured a password for this command for added security, it must be specified for XClarity Administrator to manage the switch successfully.Optional: (Switches running ENOS only) Choose whether to enable HTTPS on the switch by clicking Advanced and then selecting Enable HTTPS. This is enabled by default.
NoteFor switches running CNOS, HTTPS must be enabled on the switch before management (see Switch management considerations).
If you choose not to enable HTTPS, the current setting on the switch is used.
When the switch is ununmanaged, XClarity Administrator restores HTTPS to the original setting.
Optional: Choose whether to replace the NTP configuration on the switch with the NTP configuration and time zone settings that are defined for Lenovo XClarity Administrator by clicking Advanced and then selecting Configure NTP clients to use the NTP settings from the management server. This is enabled by default.
NoteIf you choose not to replace the NTP configuration and time zone, the timestamp for log entries and events might become out of synch between the managed switch and the management server.
When the switch is ununmanaged, XClarity Administrator restores NTP configuration and time zone to the original settings.
Click Change to change the role groups that are to be assigned to the devices.
NoteYou can select from a list of role groups that are assigned to the current user.
If you do not change the role groups, the default role groups are used. For more information about the default role groups, see Changing the default permissions.
Click Manage.
A dialog is displayed that shows the progress of this management process. To ensure that the process completes successfully, monitor the job progress.
When the process is complete, click OK.
The device is now managed by XClarity Administrator, which automatically polls the managed device on a regular schedule to collect updated information, such as inventory.
If management was not successful due to one of the following error conditions, repeat this procedure using the Force management option.
If the managing XClarity Administrator failed and cannot be recovered.
NoteIf the replacementXClarity Administrator instance uses the same IP address as the failed XClarity Administrator, you can manage the device again using the RECOVERY_ID account and password (if applicable) and the Force management option. If the managing XClarity Administrator was taken down before the devices were unmanaged.
If the devices were not unmanaged successfully.
AttentionDevices can be managed by only oneXClarity Administrator instance at a time. Management by multiple XClarity Administrator instances is not supported. If a device is managed by one XClarity Administrator, and you want to manage it with another XClarity Administrator, you must first unmanage the device from the original XClarity Administrator, and then manage it with the new XClarity Administrator.
After you finish
- Discover and manage additional devices.
- Add the newly managed devices to the appropriate rack to reflect the physical environment (see Managing racks).
- Monitor hardware status and details (see Viewing the status of switches).
- Monitor events (see Working with events).