Installing a trusted, externally-signed XClarity Management Hub server certificate
You can choose to use a trusted server certificate that was signed by a private or commercial certificate authority (CA). To use an externally-signed server certificate, generate a certificate signing request (CSR), and then import the resulting server certificate to replace the existing server certificate.
Before you begin
- If you install an externally-signed Lenovo XClarity Management Hub server certificate using a new root CA, XClarity Management Hub loses its connection to the managed devices, and you must re-manage the devices. If you install an externally-signed Lenovo XClarity Management Hub server certificate without changing the root CA (for example, when the certificate is expired), there is no need to re-manage the devices.
- If new devices are added after the CSR is generated and before the signed server certificate is imported, those devices must be restarted to receive the new server certificate.
About this task
As a best practice, always use v3 signed certificates.
The externally-signed server certificate must be created from the Certificate Signing Request that was most recently generated using the Generate CSR File button.
The externally-signed server certificate content must be a certificate bundle that contains the entire CA signing chain, including the CA’s root certificate, any intermediate certificates, and the server certificate.
If the new server certificate was not signed by a trusted third party, the next time that you connect to Lenovo XClarity Management Hub, your web browser displays a security message and dialog prompting you to accept the new certificate into the browser. To avoid the security messages, you can import the server certificate into your web browser's list of trusted certificates (see Importing the server certificate into a web browser).
XClarity Management Hub begins using the new server certificate without terminating the current session. New sessions are established using the new certificate. To use the new certificate in use, restart your web browser.
Procedure
To generate and install an externally-signed server certificate, complete the following steps.
- Create a certificate signing request and save the file to your local system.
- From the XClarity Management Hub menu bar, click Security (
 ) > Server Certificate to display the Generate Certificate Signing Request card.
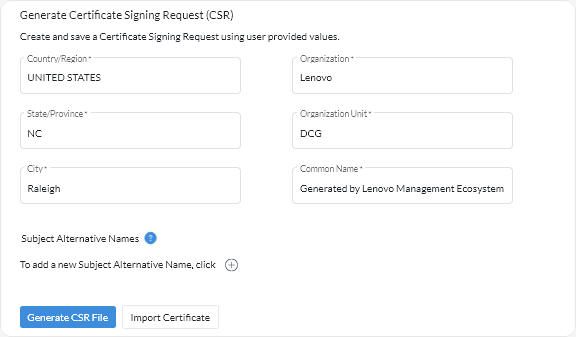
- From the Generate Certificate Signing Request (CSR) card, fill in the fields for the request.
- Two-letter ISO 3166 code for the country or region of origin associated with the certificate organization (for example, US for the United States).
- Full name of the state or province to be associated with the certificate (for example, California or New Brunswick).
- Full name of the city to be associated with the certificate (for example, San Jose). The length of the value cannot exceed 50 characters.
- Organization (company) that is to own the certificate. Typically, this is the legal incorporate name of a company. It should include any suffixes, such as Ltd., Inc., or Corp (for example, ACME International Ltd.). The length of this value cannot exceed 60 characters.
- (Optional) Organization unit that is to own the certificate (for example, ABC Division). The length of this value cannot exceed 60 characters.
- Common name of the certificate owner. This must be the hostname of the server that is using the certificate. The length of this value cannot exceed 63 characters.NoteCurrently, this attribute has no affect the certificate.
- (Optional) Subject alternative names that are added to the X.509 "subjectAltName" extension when the CSR is generated.
By default, XClarity Management Hub automatically defines subject alternative names for the CSR based on the IP address and hostname that are discovered by the network interfaces for the XClarity Management Hub guest operating system. You can customize, delete, or add to these subject alternative name values. However, the subject alternative names must have the fully-qualified domain name (FQDN) or IP address of the server, and the subject name be set to the FQDN.
The name that you specify must be valid for the selected type.- DNS (use the FQDN, for example, hostname.labs.company.com)
- IP address (for example, 192.0.2.0)
- email (for example, example@company.com)
NoteAll subject alternative names that are listed in the table are validated, saved, and added to the CSR only after you generate the CSR in the next step.
- From the XClarity Management Hub menu bar, click Security (