Operating system profiles are created automatically when you import an operating system. The profiles that are created are based on the operating system type and version. You can modify the profile, including OS credentials, hostname, networking and storage settings, license keys, and storage location.
Procedure
To configure an OS profile for deployment, complete the following steps.
- From the XClarity Orchestrator menu bar, click , and click the OS Profiles tab to display the OS Profiles page.
- Select the OS profile.
- Click the Edit icon (
 ) to display the OS Profile Details card.
 - Configure the profile attributes.
- Name. Modifying the profile name creates a new OS profile.
- Description. Modify the description for this OS profile.
- OS Credentials. Enter the OS credentials for the administrator account to be used to log in to the operating system.
- Hostname. Select what to use for the hostname. You can choose one of the following values.
- Use default hostname. (default) The hostname is “node” followed by the first 11 characters of the device ID (for example, nodeABC31213310).
- Network Setting. Select the IP settings for this profile. You can choose one of the following values.
- DHCP. (default) Use your existing DHCP infrastructure to assign IPv4 addresses to servers.
- MAC Address Setting. Select the MAC address of the port on the host where the operating system is to be installed. You can choose one of the following values.
Virtual network ports are not supported. Do not use one physical network port to simulate multiple virtual network ports.
- Use AUTO. (default) Automatically detect the Ethernet ports that can be configured and used for deployment. The first MAC address (port) that is detected is used by default. If connectivity is detected on a different MAC address, the server is automatically restarted to use the newly detected MAC address for deployment.
XClarity Administrator resource manager can automatically detect network ports in slots 1 – 16. At least one port in slots 1 – 16 must have a connection to the applicable resource manager.
If you want to use a network port in slot 17 or greater for the MAC address, you cannot use AUTO.
- Storage. Select the storage location where you want to deploy the operating-system image.
- Use Disk Drive. Install the operating-system image on the first enumerated local RAID disk drive in the managed server.
Only disk drives attached to a RAID-controller or SAS/SATA HBA are supported.
If the RAID configuration on the server is not configured correctly, or if it is inactive, the local disk might not be visible to the orchestrator server. To resolve the issue, enable the RAID configuration through configuration patterns (see Learning a server-configuration pattern from an existing server) or through the RAID management software on the server.
- If an M.2 drive is also present, the disk drive must be configured for hardware RAID.
- If an SATA adapter is enabled, the SATA mode must not be set to IDE.
- For ThinkServer servers, configuration is available only through the RAID management software on the server.
- Click Save.
After you finish
You can perform the following actions.
 ) > OS Deployment, and click the OS Profiles tab to display the OS Profiles page.
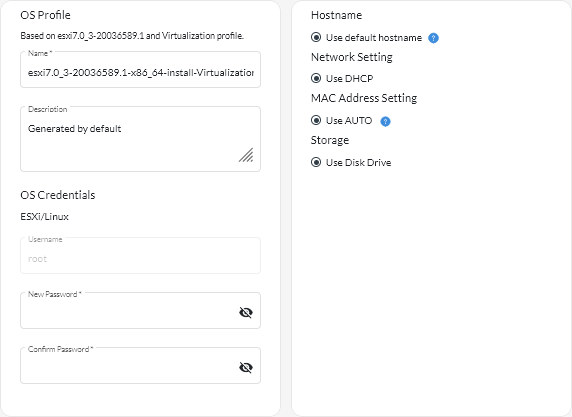
 ) or by clicking the Assign icon (
 ).NoteIf you delete the last remaining predefine profile for an operating system, the operating system is also deleted.