Creating a static resource group
You can create a resource group that contains a customized set of managed devices.
Procedure
To create and populate a static resource group, complete the following steps.
- Click the Create icon (
 ) to create an empty group. The Create Empty Group dialog is displayed.
 - Click Create. The Edit Static Group page is displayed.
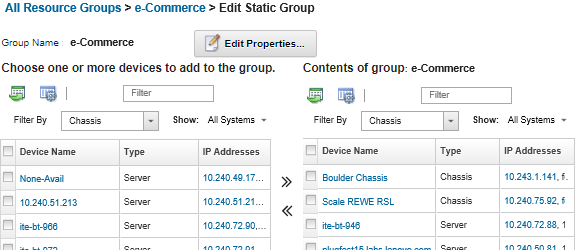
- Select the devices that you want to add to the group from the All available devices not in group list, and click the Add icon (
 ) to move the selected devices to the Contents of group list.Note
You can sort the lists to make it easier to find specific devices by clicking on the column headers. In addition, you can select a device type from the Filter By drop-down list, select a chassis from the drop-down list, or enter text (such as a name or IP address) in the Filter field to list only those devices that meet the selected criteria
If you choose to move a chassis to the group, the devices in the chassis are not automatically added to the group. To add all chassis components to the group, select in the Show drop-down menu to list all components in the specified chassis, select the checkbox next to the Device Name column heading to select all devices, and then click the Add icon (
) to move the selected devices to the Contents of group list.
After you finish
You can see which resource groups a device belongs from the Groups column on the all-devices pages and the device summary pages.
You can add or remove a device from a static resource group from the all-devices pages and the device details pages by clicking or .
NoteYou can add and remove devices only from static resource groups. You cannot remove them from dynamic groups.You can modify resource-group properties by clicking .