Monitoring jobs
You can view a log of all jobs that are started by Lenovo XClarity Administrator. The jobs log includes jobs that are running, completed, or have errors.
About this task
Jobs are longer running tasks that are performed against one or more devices. For example, if you deploy an operating system to multiple servers, each server deployment is listed as a separate job.
Jobs run in the background. You can see the status of each job from the jobs log.
The jobs log contains information about each job. The log can contain a maximum of 1000 jobs or 1 GB. When the maximum size is reached, the oldest jobs that completed successfully are deleted. If there are no jobs that completed successfully in the log, the oldest jobs that completed with warnings are deleted. If there are no jobs that completed successfully or with warnings in the log, the oldest jobs that completed with errors are deleted.
Procedure
Complete one of the following steps to display the jobs log.
From the XClarity Administrator title bar, click Jobs to display a summary of jobs that are running, completed, and have errors.
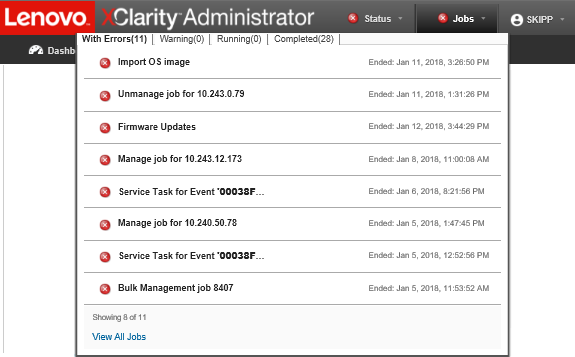 From this pull down, you can click the following tabs:
- Errors. Displays a list of all jobs that have errors associated with them.
- Warnings. Displays a list of all jobs that have warnings associated with them.
- Running. Displays a list of all jobs that are currently in progress.
- Completed. Displays a list of all jobs that are completed.
Hover over a job entry in the pull down to get more information about the job, including the status, progress, and user that created the job.
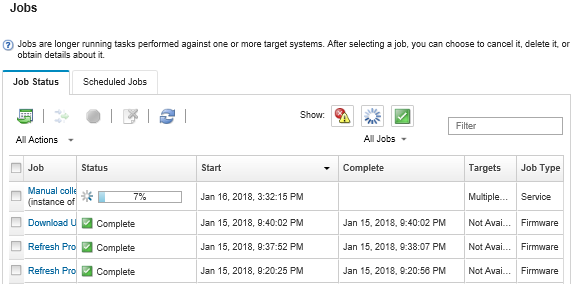
From the XClarity Administrator title bar, click , and click the View All Jobs link to display the Jobs Status page.
From the XClarity Administrator menu bar, click and click the Job Status tab to display the Jobs Status page.
After you finish
Create job schedules by clicking the Scheduled Jobs tab (see Scheduling jobs).
- View more information about a specific job by clicking the job description in the Jobs column. A dialog is displayed with a list of subtasks (subjobs) and their targets, a summary of the subtasks including any necessary actions, and log details including the severity and timestamp for each message. You can choose to hide or show logs for child tasks.
- For scheduled jobs, view information about the job schedule by clicking the
this
link under the job description in the Jobs column. - Change the number of jobs that are displayed per page. The default is 10 jobs. You can display 25, 50, or all jobs.
- Narrow the list of jobs that are displayed:
- List only jobs from a specific source by clicking Job Types and choosing from the following options.
All Job Types
Service
Management
Configuration
Firmware
Health
Power
Remote Access
System ID
OS Images
OS Deployment
OS Profile Export
Custom
Inventory
Unknown
- List only scheduled jobs that are associated with a specific schedule type by clicking Schedule Types and choosing from the following options.
All Schedule Types
One Time
Recurring
Triggered
- Hide or show jobs that have errors or warnings by clicking the Hide error/warning jobs icon (
 ).
). - Hide or show jobs that are currently running by clicking the Hide running jobs icon (
 ).
). - Hide or show jobs that are completed by clicking the Hide completed jobs icon (
 ).
). - List only jobs that contain specific text by entering the text in the Filter field.
- If filtering is applied to the page, remove the filter by clicking the Show All Jobs icon (
 ).
). - Sort the jobs by column by clicking a column heading.
- List only jobs from a specific source by clicking Job Types and choosing from the following options.
- Export the jobs list as a CSV file by clicking the Export as CSV icon (
 ).NoteThe timestamps in the exported log use the local time that is specified by the web browser.
 - Cancel running jobs or subtasks by selecting one or more running jobs or subtasks and clicking the Stop icon (
 ).NoteIt might take several minutes to cancel the job.
 - Delete completed jobs or subtasks from the jobs log by selecting one or more completed jobs or subtasks and clicking the Delete icon (
 ).
). Export information about specific jobs by selecting the jobs and clicking the Export as CSV icon (
).- Refresh the jobs log by clicking the Refresh icon (
 ).
).