Scheduling jobs
You can create schedules in Lenovo XClarity Administrator to run certain tasks at specific times.
About this task
You can schedule the following types of jobs:
Simple tasks, such as powering off and rebooting
Collecting service data for specific devices
Refreshing the firmware-update and OS device-driver catalogs from the Lenovo website
Refreshing the XClarity Administrator updates catalog from the Lenovo website
Downloading firmware from the Lenovo website
Updating firmware and OS device drivers on managed devices
Backing up XClarity Administrator data and settings
Backing up and restoring switch configuration data
Only one time (immediately or at a later time)
On a recurring basis
When a specific event occurs
Procedure
To create and schedule a job, complete the following steps.
For complex tasks, such as updating firmware and collecting service data, create the job from the current the task page or dialog.
Click Schedule to create a schedule for running this task. The Schedule New Job dialog is displayed.
Enter a name for the job.
Specify when the job is to be run. The available options depend on the type of job. Some jobs cannot be recurring or triggered by an event
One Time. These jobs run only one time. Specify the date and time when you want this job to run.
Recurring. These jobs run more than one time. Specify the when and how often you want this job to run.
Triggered by Event. These jobs run when a specific event occurs.
Specify the date and time when you want this job to run, and click Next.
Select the event to trigger the job.
Click Create Job.
For simple tasks, such as powering on and rebooting, create the job schedule from the Jobs page.
From the XClarity Administrator menu bar, click , and click the Scheduled Job tab to display the Scheduled Jobs page.
Click the Create icon (
 ) to display the Schedule New Jobs dialog.
Enter a name for the job.
Specify when the job is to be run.
One Time. These jobs run only one time.
Specify the date and time when you want this job to run, and click Next.
Select managed devices on which the job is to run.
Recurring. These jobs run more than one time.
Specify the when and how often you want this job to run.
Select managed devices on which the job is to run.
Triggered by Event. These jobs run when a specific event occurs.
Specify the date and time when you want this job to run, and click Next.
Select managed devices on which the job is to run, and click Next.
Select the event to trigger the job.
Click Create.
After you finish
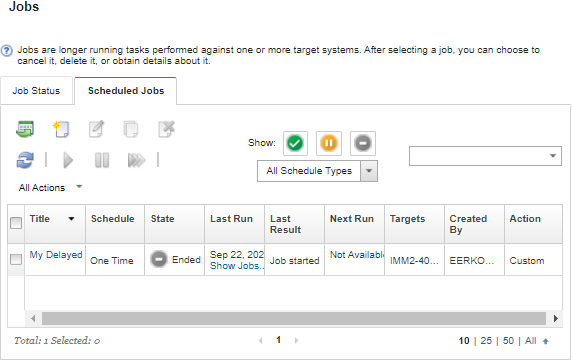
View information about all active and completed jobs for a specific job schedule by clicking the link in the Job column.
Narrow the list of job schedules that are displayed by a specific schedule type by clicking Schedule Types and choosing from the following options:
All Schedule Types
One Time
Recurring
Triggered
Hide or show only job schedules that are in a specific state by clicking one of the following icons:
All scheduled jobs that are active by clicking the Active icon (
 ).
).All scheduled jobs that are not active by clicking the Paused icon (
 ).
).All scheduled jobs that already ran and are not scheduled to run again by clicking the Ended icon (
 ).
).
List only scheduled jobs that contain specific text by entering the text in the Filter field.
Sort the scheduled jobs by column by clicking a column heading.
View when the job ran last by looking at the Last Run column. View the status of the last run job by clicking the “Job Status” link in that column.
View when the job is scheduled to run next by looking at the Next Run column. View a list of all future dates and times by clicking the “More” link in that column.
Immediately run the job that is associated with the schedule by clicking the Run icon (
 ).
).Disable or enable a job schedule by clicking the Pause icon (
 ) or Activate icon (
 ) respectively.
Copy and then modify a job schedule by clicking the Copy icon (
 ).
).Edit a job schedule by clicking the Edit icon (
 ).
).Delete one or more selected job schedules by clicking the Delete icon (
 ).
).Export information about specific job schedules by selecting the schedules and clicking the Export as CSV icon (
 ).
).Refresh the list of job schedule by clicking the .