Setting up a CyberArk identity-management system
CyberArk is an external password vault that optionally can be used with Lenovo XClarity Administrator to store XClarity Administrator and Lenovo XClarity Controller credentials. After an account password is stored in CyberArk, the password is managed by CyberArk
About this task
XClarity Administrator allows you to store your XCC passwords in identity-management systems provided by CyberArk, a third party service. Lenovo is not responsible for the CyberArk service, and you are responsible for your direct relationship with CyberArk.
If user accounts for a ThinkSystem or ThinkAgile server are onboarded onto CyberArk, you can choose to have XClarity Administrator retrieve credentials from CyberArk to log in to the server when initially setting up the servers for management (with managed or local authentication). Before credentials can be retrieved from CyberArk, the CyberArk paths must be defined in XClarity Administrator and mutual trust must be established between CyberArk and XClarity Administrator using TLS mutual authentication through client certificates.
Procedure
To configure XClarity Administrator to use CyberArk, complete the following steps.
- Import the CyberArk root CA certificate in to XClarity Administrator.
Download the root CA certificate from CyberArk.
From the XClarity Administrator menu bar, click .
Click Trusted Certificates in the Certificate Management section.
Click the Create icon (
 ) to add a certificate.
Browse for the file or paste the PEM-formatted certificate text.
Click Create.
- Add paths that identify the location of onboarded user accounts in CyberArk.
From the XClarity Administrator menu bar, click .
Click CyberArk under the Identity Management section.
Click the Paths tab.
Click the Create icon (
) to display the Create CyberArk Path dialog.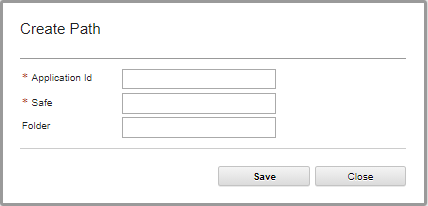
Optionally specify the application ID, safe and folder where the user accounts are stored in CyberArk.
If you specify the application ID and safe and optionally the folder, XClarity Administrator attempt to find the user account in the specified location.
If you specify a combination of fields other than application ID and safe (for example, if you specify only the application ID, only the safe and folder, or only the application ID and folder), XClarity Administrator filters the path using the specified values.
Click Apply.
After you finish
Modify a selected CyberArk path by clicking the Edit icon (
 ).
).Delete a selected CyberArk path by clicking the Delete icon (
 ).
).