Importing custom unattend files
You can import custom unattend files into the OS images repository. These files can then be used to customize Linux and Windows OS-images profiles.
About this task
| Operating system | Supported File Types | More information |
|---|---|---|
| CentOS Linux | Not supported | |
| Microsoft® Windows® Azure Stack HCI | Not supported | |
| Microsoft Windows Hyper-V Server | Not supported | |
| Microsoft Windows Server | Unattend (.xml) | For more information about unattend files, see the Unattended Windows Setup Reference webpage. |
| Red Hat® Enterprise Linux (RHEL) Server | Kickstart (.cfg) | For more information about unattend files, see the Red Hat: Automating the Installation with Kickstart webpage. Consider the following when adding %pre, %post, %firstboot sections in the file.
|
| Rocky Linux | Kickstart (.cfg) | For more information about unattend files, see the Red Hat: Automating the Installation with Kickstart webpage. Consider the following when adding %pre, %post, %firstboot sections in the file.
|
| SUSE® Linux Enterprise Server (SLES) | AutoYast (.xml) | For more information about unattend files, see the SUSE: AutoYaST webpage. |
| Ubuntu | Not supported | |
| VMware vSphere® Hypervisor (ESXi) with Lenovo Customization | Kickstart (.cfg) | Supported only for ESXi 6.0u3 and later updates and 6.5 and later. For more information about unattend files, see the VMware: Installing or Upgrading Hosts by Using a Script webpage. Consider the following when adding %pre, %post, %firstboot sections in the file.
|
You can inject predefined and custom macros (configuration settings) in the unattend file using the unique name of the object. Predefined values are dynamic based on the XClarity Administrator instances. Custom macros are dynamic based on user input that is specified during OS deployment.
NoteSurround the macro name with a hash symbol (#).
For nested objects, separate each object name using a period (for example, #server_settings.server0.locale#).
For custom macros, do not include the top-most object name. For predefined macros, prefix the macro name with "predefined."
When an object is created from a template, the name is appended with a unique number, starting with 0 (for example, server0 and server1).
You can see the name for each macro from the Deploy OS Images dialog on the Custom Settings tabs by hovering over the Help icon (
 ) next to each custom setting.
For a list of predefined macros, see Predefined macros. For information about custom configuration settings and macros, see Custom macros.
XClarity Administrator provides the following predefined macros that are used to communicate status from the OS installer, as well as several other critical installation steps. It is strongly recommended that you include these macros in unattend file (see Injecting predefined and custom macros to an unattend file).
#predefined.unattendSettings.preinstallConfig#
#predefined.unattendSettings postinstallConfig#
The OS images repository can store an unlimited number of predefined and custom files, if space is available to store the files.
Procedure
To import unattended files into the OS-images repository, complete the following steps.
- Click the Unattend Files tab.
- Click the Import File icon (
 ). The Import File dialog is displayed.
 - Click the Local Import tab to upload files from the local system, or click the Remote Import tab to upload files from a remote file server.NoteTo upload a file from a remote file server, you must first create a remote file-server profile by clicking the
Configure File Server icon (  ). For more information, see
 Configuring a remote file server
After you finish
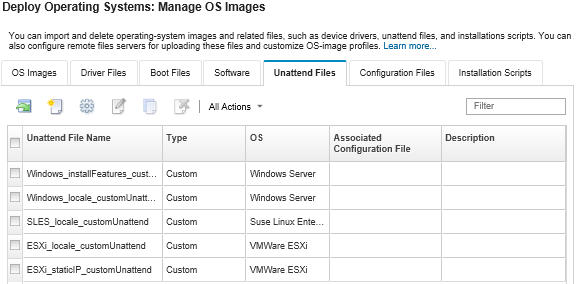
The unattend-file image is listed on the Unattend Files tab on the Manage OS Images page.
From this page, you can perform the following actions.
Create an unattend file by clicking the Create icon (
 ).
).The editor identifies the location of any errors that are found in the file. Note that some messages are English only.
Associate an unattend file with a configuration-settings file (see Associating an unattend file with a configuration settings file).
View and modify an unattend file by clicking the Edit icon (
 ).
).The editor identifies the location of any errors that are found in the file. Note that some messages are English only.
Copy an unattend file by clicking the Copy icon (
 ).
).If you copy an unattend file that is associated with a configuration-settings file, the associated configuration-settings file is also copied and the association is automatically created between both copied files.
Remove selected unattend files by clicking the Delete icon (
 ).
).Create a remote-file-server profile by clicking the Configure File Server icon (
).
For information about adding an unattend file to a customized OS image profile, see Creating a custom OS-image profile.