Viewing the details of a switch
You can view detailed information about a managed switch from Lenovo XClarity Administrator, including the firmware levels and IP addresses.
Procedure
To view the details of a specific switch that is managed by XClarity Administrator, complete the following steps.
- From the XClarity Administrator menu bar, click . The Switches page is displayed with a tabular view of all switches that are installed in managed chassis.
You can sort the table columns to make it easier to find the switches that you want to manage. In addition, enter text (such as a name or IP address) in the Filter field to further filter the switches that are displayed.
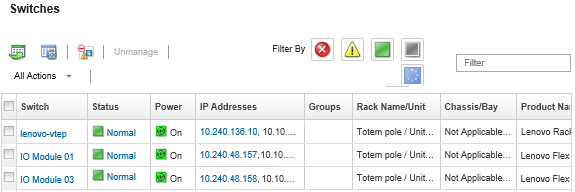
- Click the switch in the Switches column. The Summary page is displayed, showing the properties and a list of components that are installed in that switch.
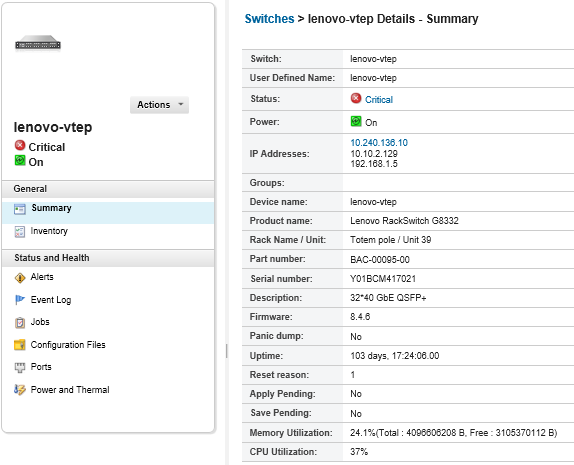
- Complete one or more of the following steps to view detailed inventory information:NoteSome details might not be available for all switches.
- Click Summary to view a summary of the switch, including system information and firmware (see Viewing the status of storage devices).
- Click Inventory Details to view details about the switch components, including:
- Firmware levels for the switch
- Details of the management-controller network, such as the hostname, IPv4 address, IPv6 address, and MAC addresses
- Asset details of the switch
- Click I/O Connectivity to display connectivity details for the selected switch and the associated network adapters that are installed in switch.
- Click Alerts to display alerts in the alerts list that are related to the switch (see Working with alerts).
- Click Event Log to display the events in the event log that are related to the switch (see Working with events).
- Click Configuration Files to backup and restore the switch configuration (see Backing up and restoring switch-configuration data).
- Click Deployment History to view information about switch-configuration templates that have been deployed to switch (see Viewing switch-configuration deployment history).
- Click Jobs to display configuration-data files for the switch (see Monitoring jobs).
- Click Ports to display the status and configuration of all ports in a managed switch , and to enable or disable switch ports.NoteFor Flex switches, click the
Refresh icon (  ) to collect the current port data. Collecting data might take several minutes.
 - Click Light Path to display the current state of each LED on the switch.
- Click Power and Thermal to display information about temperature, power supplies, and fans.TipTo collect the latest power and thermal data, Use the refresh button on your web browser. Collecting data might take several minutes.
After you finish
- View a Flex switch in graphical rack or chassis view by clicking or .
- View a RackSwitch switch in graphical rack view by clicking .
- Launch the management controller web interface for the switch by clicking the IP address link (see Launching the management controller interface for a switch).
- Launch the switch SSH console (see Launching a remote SSH session for a switch).
- Power the switch on and off (see Powering on and off a switch).
- (RackSwitches only) Modify system information by selecting a switch and clicking Edit Properties.
- Export detailed information about the switch to a CSV file by clicking the .Note
For more information about inventory data in the CSV file, see the GET /switches/<UUID_list> REST API.
When importing a CSV file into Microsoft Excel, Excel treats text values that contain only numbers as numeric values (for example, for UUIDs). Format each cell as text to correct this error.
- Exclude events that are of no interest to you from all pages on which events are displayed by clicking (see Excluding events).
- Resolve issues that might arise between the XClarity Administrator security certificate and the security certificate of the RackSwtich or the CMM in the chassis where the Flex System switch is installed by selecting a switch and clicking (see Resolving an untrusted server certificate).