Global settings serve as defaults settings when operating systems are deployed.
About this task
From the Global Settings page, you can configure the following settings:
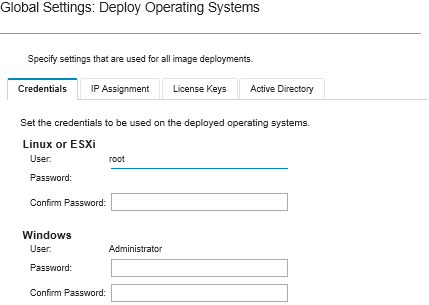
- The password for the administrator user account to be used for deploying the operating systems
- The method to use to assign IP addresses to servers
- License keys to use when activating installed operating systems
- Optionally join an Active Directory domain as part of the Windows operating-system deployment
Procedure
To configure the global settings to be used for all servers, complete the following steps.
- From the Lenovo XClarity Administrator menu bar, click to display the Deploy OS Images page.
- Click the Global Settings icon (
 ) to display the Global Settings: Deploy Operating Systems dialog.
 - On the Credentials tab, enter the password for the administrator account to be used to log in to the operating system.
- On the IP Assignment tab, select the following options.
- Optional: Select Use VLANs to allow configuring VLAN settings in the Network Settings dialog (see Configuring network settings for managed servers).
VLAN tagging is not supported for Linux operating-system deployments.
VLAN tagging is not supported for operating-system deployments on ThinkServer devices.
VLAN mode is supported only for servers that have MAC addresses in their inventory. If AUTO is the only MAC address that is available for a server, then VLANs cannot be used to deploy operating systems to that server.
- Select the method for assigning IP addresses when configuring the deployed operating system:
The XClarity Administrator network interface that is used for management must be configured to connect to the baseboard management controller using the same IP address method that you choose on the Global Settings: Deploy Operating Systems dialog. For example, if XClarity Administrator is set up to use eth0 for management, and you choose to use manually assigned static IPv6 addresses when configuring the deployed OS, then eth0 must be configured with an IPv6 address that has connectivity to the baseboard management controller.
- Manually assign a static IPv4 address. If you choose to assign static IPv4 addresses, ensure that you configure the static IPv4 address, gateway address, and subnet mask for the server before deploying the operating system (see Configuring network settings for managed servers).
- Use Dynamic Host Configuration Protocol (DHCP) to assign the addresses. If you already have an existing DHCPv4 infrastructure in your network, you can use that infrastructure to assign IP addresses to servers.
DHCP IPv6 is not supported for operating-systems deployment.
- Manually assign a static IPv6 address. If you choose to assign static IPv6 addresses, ensure that you configure the static IPv6 address, gateway address, and subnet mask for the server before deploying the operating system (see Configuring network settings for managed servers).
- Optional: On the License Keys tab, specify the global volume-license keys to use when activating installed Windows operating systems.
When you specify global volume-license keys on this tab, you can select the specified license keys for any Windows OS-image profiles from the Deploy OS Images page.
XClarity Administrator supports global volume-license keys for Windows installations and individual retail-license keys for both Windows and VMware ESXi. You can specify individual retail-license keys as part of the deployment procedure (see
Deploying an operating-system image). - Optional: On the Active Directory tab, configure the Active Directory settings for Windows operating-system deployments. For information about integrating with Active Directory, see Integrating with Windows Active Directory.
- Click OK to close the dialog.