Managing servers
You can use Lenovo XClarity Orchestrator manage several types of servers.
Before you begin
To perform this task, you must be a member of a user group to which the predefined Supervisor or Security Administrator role is assigned.
Review the management considerations before managing a device (see Device management considerations).
Review the global discovery settings before managing a device (see Configuring global discovery settings).
To discover and manage edge devices that do not respond to service discovery protocol, see Managing ThinkEdge Client devices.
About this task
XClarity Orchestrator monitors and manages devices through resource managers. When you connect a resource manager, XClarity Orchestrator manages all devices that are managed by that resource manager.
You can also bring devices into management using XClarity Orchestrator. XClarity Orchestrator lists devices that were already discovered (but not managed) by the resource managers. When you manage discovered devices from XClarity Orchestrator, the devices are managed by resource manager that discovered it. When you manually discover and manage devices using IP addresses, hostnames, or subnets, you choose which resource manager you want to use to manage the devices. XClarity Management Hub can be used be used to manage ThinkEdge Client devices. Lenovo XClarity Administrator can be used to manage servers, storage, switches, and chassis.
- ThinkSystem and ThinkAgile servers and appliances
- ThinkEdge Servers ( SE350 and SE450)
- Flex System chassis, and ThinkSystem and Flex System devices in a Flex System chassis
- ThinkServer rack and tower servers
- System x, Converged HX, and NeXtScale servers and appliances
- Storage devices
Procedure
To manage your servers, complete one of the following procedures.
- Manage discovered servers
To manage devices that were automatically discovered, complete the following steps.
From the XClarity Orchestrator menu bar, click Resources (
 ) > New Devices to display the Discover and manage new devices card.
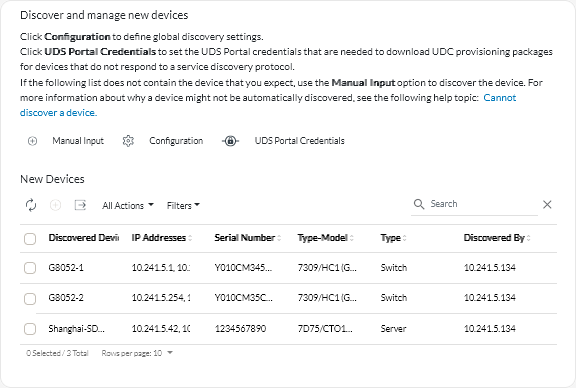
- Click the to discover all manageable devices in the XClarity Orchestrator domain. Discovery might take several minutes.
- Select one or more servers that you want to manage.
- Click the Manage icon (
 ) to display the Manage Discovered Devices dialog.
 - Review the list of selected devices to manage, and click Next.
- Specify the username and password for authenticating to the server.TipConsider using a supervisor or administrator account to manage the device. If an account with lower-level authority is used, management might fail, or management might succeed but some features might fail.
- Optional: Select Create a recovery account and disable all local users, and then specify the recovery password.
When disabled, local user accounts are used for authentication.
When enabled, the assigned resource manager creates a managed-authentication user account and a recovery account (RECOVERY_ID) on the server, and all other local user accounts are disabled. The managed-authentication user account is used to by XClarity Orchestrator and the resource manager for authentication. If there is a problem with XClarity Orchestrator or resource manager, and it stops working for any reason, you cannot log in to the baseboard management controller using normal user accounts. However, you can log in using the RECOVERY_ID account.
ImportantEnsure that you record the recovery password for future use.NoteThe recovery account is not supported for ThinkServer and System x M4 servers. - Optional: Enable Set new password if credentials are expired, and then specify the new server password.
If the current server password has expired, discovery will fail until the password is changed. If you specify a new password, the credentials are changed and the management process can continue. The password is changed only if the current password is expired.
- Select Manage.
A job is created to complete the management process in the background. You can monitor the status of the management process from the dialog or from the jobs log by clicking Monitoring (
 ) > Jobs (see Monitoring jobs).If management was not successful due to one of the following error conditions, repeat this procedure using the Force management option.
- The resource manager failed and cannot be recovered.NoteIf the replacement resource manager instance uses the same IP address as the failed resource manager, you can manage the device again using the
RECOVERY_ID account and password (if applicable) and the Force management option. - The resource manager was taken down before the devices were unmanaged.
- Devices were not unmanaged successfully.
- XClarity Orchestrator show a managed device as offline after the device’s IP address was changed.
- The resource manager failed and cannot be recovered.
- Manually discover and manage servers
To manually discover and then manage specific servers, complete the following steps.
From the XClarity Orchestrator menu bar, click Resources (
) > New Devices to display the Discover and manage new devices card.- Click Manual Input to display the Discover New Devices dialog.
- Select Devices that respond to service discovery protocol, and then click Next.
- Select Manual, and then click Next.
Choose how you want to discover the devices and then specify the appropriate values.
- IP Addresses/Hostnames
- IP ranges
- Subnets
- Select the Lenovo XClarity Administrator resource manager that you want to use to manage the devices
- Click Discover devices.
- Specify the username and password for authenticating to the server.TipConsider using a supervisor or administrator account to manage the device. If an account with lower-level authority is used, management might fail, or management might succeed but some features might fail.
- Optional: Select Create a recovery account and disable all local users, and then specify the recovery password.
When disabled, local user accounts are used for authentication.
When enabled, the assigned resource manager creates a managed-authentication user account and a recovery account (RECOVERY_ID) on the server, and all other local user accounts are disabled. The managed-authentication user account is used to by XClarity Orchestrator and the resource manager for authentication. If there is a problem with XClarity Orchestrator or resource manager, and it stops working for any reason, you cannot log in to the baseboard management controller using normal user accounts. However, you can log in using the RECOVERY_ID account.
ImportantEnsure that you record the recovery password for future use.NoteThe recovery account is not supported for ThinkServer and System x M4 servers. - Optional: Enable Set new password if credentials are expired, and then specify the new server password.
If the current server password has expired, discovery will fail until the password is changed. If you specify a new password, the credentials are changed and the management process can continue. The password is changed only if the current password is expired.
- Select Manage.
A job is created to complete the management process in the background. You can monitor the status of the management process from the dialog or from the jobs log by clicking Monitoring (
) > Jobs (see Monitoring jobs).If management was not successful due to one of the following error conditions, repeat this procedure using the Force management option.- The resource manager failed and cannot be recovered.NoteIf the replacement resource manager instance uses the same IP address as the failed resource manager, you can manage the device again using the
RECOVERY_ID account and password (if applicable) and the Force management option. - The resource manager was taken down before the devices were unmanaged.
- Devices were not unmanaged successfully.
- XClarity Orchestrator show a managed device as offline after the device’s IP address was changed.
- The resource manager failed and cannot be recovered.
After you finish
You can perform the following actions on the managed device.
- Monitor device status and details (see Viewing devices status and Viewing device details).
- Unmanage and remove a selected device by clicking click Resources () and then click the device type in the left navigation to display a card with a tabular view of all managed devices of that type, select the devices to unmanage, and then click the Unmanage icon (
 ).Note
- Ensure that there are no active jobs running on the device.
- If XClarity Orchestrator cannot connect to the resource manager (for example, if credentials are expired or if there are network issues), select Force unmanage even if the device is not reachable.
- For most devices, XClarity Orchestrator and the resource manager retain certain information about the device after it is unmanaged. That information is reapplied when you manage the same device again.
- XClarity Orchestrator automatically unmanage devices that are offline for a 24 hours or more by default (see Configuring global discovery settings).
- Troubleshoot issues when connecting a resource manager (see Cannot discover a device and Cannot manage a resource).