Setting up XClarity Management Hub (ESXi using VMware vSphere)
Set up the Lenovo XClarity Management Hub virtual appliance using the VMware vSphere deployment wizard on a ESXi host.
Procedure
To install the XClarity Management Hub virtual appliance, complete the following steps.
- Download the XClarity Management Hub virtual-appliance image from the Management Hub download webpage to a client workstation. Log on to the Web site, and then use the access key that was given to you to download the image.
- Install the virtual appliance on the host.
- Right-click the host, and click .To deploy the virtual appliance, keep the following considerations in mind as you progress through the virtual-appliance deployment wizard.
- OVF Template Details. Select the OVA file for XClarity Management Hub.
- Name and location. Choose an appliance name that is unique to this host.
- Storage. Choose an SSD datastore that has a minimum of 340 GB of storage available.
- Disk Format. Choose the disk format that meets the needs of your organization. If you are not sure which format to choose, select Thin Provision.
- Network Mapping. Choose Bridge to VM Network. You will modify this setting when you associate the virtual machine with the network.ImportantXClarity Management Hub includes the VMXNET 3 driver. You can ignore any VMware errors that say that the driver is not supported.
- Properties. This page is ignored when using vSphere deployment.
- Ready to complete. Clear the Power on after deployment option.
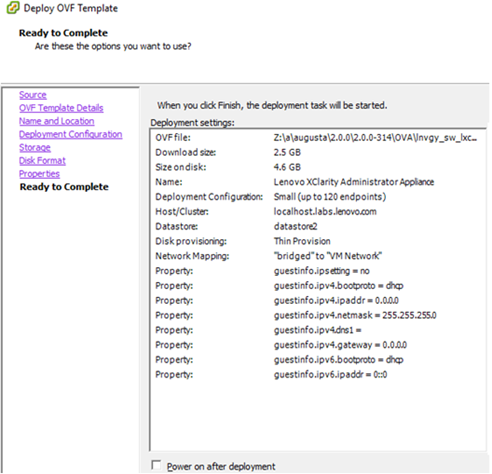
TipYou can change the processor and memory configuration settings in VMware before powering on the virtual appliance. For information about configuration recommendations based on the number of devices in your environment, seeSupported hardware and software – XClarity Management Hub. The following figure show example configuration settings when the wizard is complete.
- Right-click the host, and click .
- Associate the virtual machine with the management network for port group 0.
- Click the host to display the host details in the content pane of the VMware vSphere Client.
- Associate Network adapter 1 with the network that you just added.
- In the left navigation pane, right-click the virtual machine, and then click Edit Settings.
- Click the Hardware tab, click Network adapter 1, and then select the network label that you defined as the network connection for the Port Group properties.ImportantEnsure that the
XClarity Management Hub network adapter 2 is connected to a different port group than network adapter 1. 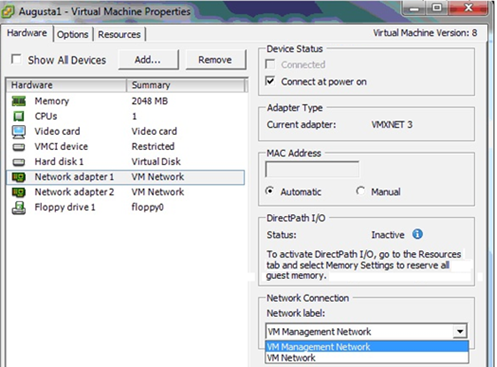
- (Flex switches in a chassis only) Set up NIC teaming to provide failover capability between the two Flex switches installed in the chassis.
- From the host Configuration tab, and click the vSwitch0 Properties link.
- Click the Network Adapters tab, and then select vmnic0.
- Click Add.
- Follow the steps in the Add Adapter Wizard to add vmnic1.In the Policy Failover page, move vmnic1 down to the Standby Adapters.
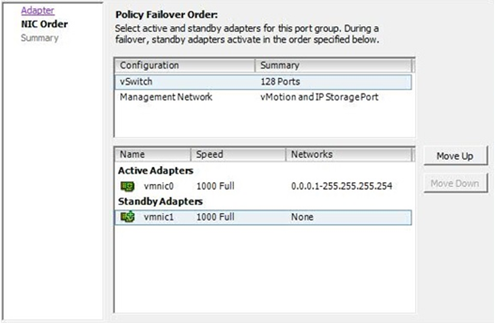
- To complete the setup, continue through the Add Adapter Wizard.
- Click the host to display the host details in the content pane of the VMware vSphere Client.
- (Physically separate management and data network only) Associate the virtual machine with the management network for port group 1.
- Power on the virtual machine:
(Optional) Using a configuration file to set the IP settings
If you are not using a DHCP server, you can optionally use a configuration file to specify the IP settings that you want to use to access the XClarity Management Hub web interface using the Eth0 network interface.
The configuration file (eth0_config) is contained in an ISO file that you create and mount to the virtual machine before the XClarity Management Hub is started for the first time. When the XClarity Management Hub starts the first time, it configures the IP address for the Eth0 network using the static IP address that is defined in the eth0_config file and displays the web interface to set up initially and configure the appropriate settings (see Configuring the XClarity Management Hub).
To use a configuration file, perform the following steps before powering on the virtual appliance.
- Create a file named eth0_config (with no file extension) that contains the following IPv4 parameters that you want the virtual machine to use at startup.
- IPV4_ADDR=
- IPV4_NETMASK=
- IPV4_GATEWAY=
- IPV6_ADDR=
- IPV6_GATEWAY=
You can use the echo command to create the file, for example:ECHO IPV4_ADDR=1.1.1.1 > ./eth0_config
ECHO IPV4_NETMASK=255.255.255.05 >> ./eth0_config
ECHO IPV4_GATEWAY=1.1.1.5 >> ./eth0_config
ECHO IPV6_ADDR=1001:1002:1003:1004::2 >> ./eth0_config
ECHO IPV6_GATEWAY=1001:1002:1003:1004::1 >> ./eth0_config - Create an ISO image that contains the eth0_config file.
To create an ISO image on Windows, use your favorite ISO software. On Linux, use the mkisofs command, for example:
mkisofs -V IP4ADDR -J -o ./boot.iso ./eth0_configwhere -V is the volume label, -J is for Joliet format, -o is the output file name, and ./eth0_config is the file to be included in the ISO image.
- Upload the ISO image to a suitable location using the Datastore Browser.
- Mount the .ISO image to the virtual machine. The ISO file must reside in the datastore of the ESXi host so that it can be mounted as a CD/DVD drive on the XClarity Management Hub virtual machine.
- Right click the virtual machine, and click Edit Settings.
- Click Add to display the Add Hardware wizard.
- Click CD/DVD Drive, and click Next.
- Select Use ISO image, and click Next.
- Select the ISO image, and click Next.
- Select the virtual device node, and click Next.
- Click Finish.
NoteYou can unmount the drive and delete the ISO image after you log in to theXClarity Management Hub web interface and finish configuring the appropriate settings.
After you finish
Log in and configure XClarity Management Hub (see Configuring the XClarity Management Hub).