Configuring the network
When you initially set up Lenovo XClarity Orchestrator, you must configure a single network interface (using IPv4 and IPv6 settings). You can also configure Internet routing settings.
Before you begin
- The interface must be configured to support discovery and management. It must be able to communicate with the resource managers and the devices that they manage.
- If you intend to manually send collected service data to Lenovo Support or use automatic problem notification (Call Home), the interfaces must be connected to the Internet, preferably through a firewall.
- If you change the XClarity Orchestrator virtual-appliance IP address after connecting resource managers, XClarity Orchestrator will lose communication with the managers, and the managers will appear offline. If you need to change the virtual-appliance IP address after XClarity Orchestrator is up and running, ensure that all resource managers are disconnected (deleted) before changing the IP address.
- If the network interface is configured to use the Dynamic Host Configuration Protocol (DHCP), the IP address might change when the DHCP lease expires. If the IP address changes, you must disconnect (delete) the resource managers, and then connect them again. To avoid this problem, either change the network interface to a static IP address, or ensure that the DHCP server is configured such that the DHCP address is based on a MAC address or that the DHCP lease does not expire.
- Network address translation (NAT), which remaps one IP address space into another, is not supported.
Procedure
To configure network settings, click Administration (![]() ) > Networking from the XClarity Orchestrator menu bar, and then complete one or more of the following steps.
) > Networking from the XClarity Orchestrator menu bar, and then complete one or more of the following steps.
- Configure IP settings
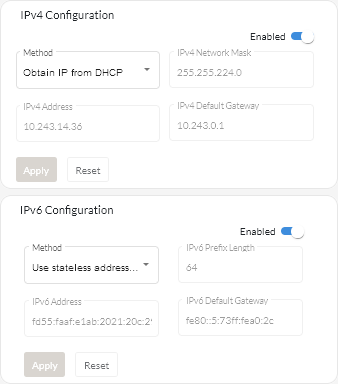
You can choose to use IPv4 and IPv6 network settings from the IPv4 Configuration and IPv6 Configuration cards. Enable and modify the applicable IP configuration settings, and then click Apply.
- IPv4 settings. You can configure the IP assignment method, IPv4 address, network mask, and default gateway.
For the IP assignment method, you can choose to use a statically-assigned IP address or obtain an IP address from a DHCP server. When using a static IP address, you must provide an IP address, network mask, and default gateway. The default gateway must be a valid IP address and must be on the same subnet as network interface.
If DHCP is used to obtain an IP address, the default gateway also uses DHCP.
- IPv6 settings. You can configure the IP assignment method, IPv6 address, prefix length, and default gateway.
For the IP assignment method, you can choose to use a statically assigned IP address, stateful address configuration (DHCPv6), or a stateless address auto configuration. When using a static IP address, you must provide an IPv6 address, prefix length and gateway. The gateway must be a valid IP address and must be on the same subnet as network interface.
- IPv4 settings. You can configure the IP assignment method, IPv4 address, network mask, and default gateway.
- Configure Internet routing settings
Optionally configure Domain Name System (DNS) settings from the DNS Configuration card. Then, click Apply.
Currently, only IPv4 addresses are supported.
Choose whether to use DHCP to obtain the IP addresses or to specify static IP addresses by enabling or disabling DHCP DNS. If you choose to use static IP addresses, specify the IP address for at least one and up to two DNS servers.
Specify the DNS host name and domain name. You can choose to retrieve the domain name from a DHCP server or specify a custom domain name.
Note- If you choose to use a DHCP server to obtain the IP address, any changes that you make to the DNS Server fields are overwritten the next time XClarity Orchestrator renews the DHCP lease.
- When you change any DNS settings, you must manually restart the virtual machine to apply the changes.
- If you change the DNS setting from using from DHCP to a static IP address, ensure that you also change the IP address of the DNS server itself.

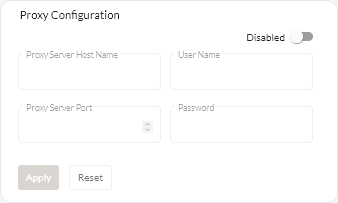
- Configure HTTP proxy settings
Optionally enable and specify the proxy server host name, port, and optional credentials from the Proxy Configuration card. Then, click Apply.
Note- Ensure that the proxy server is set up to use basic authentication.
- Ensure that the proxy server is set up as a non-terminating proxy.
- Ensure that the proxy server is set up as a forwarding proxy.
- Ensure that load balancers are configured to keep sessions with one proxy server and not switch between them.
After you finish
Continue initial setup by going to Configuring the date and time.